这里还是基于对《Pro ASP.NET Core 3.0》的学习,练习一下在Visual Studio Code中创建ASP.NET Core应用。这里将从头开始创建一个Web项目,然后运行EntityFrameworkCore来访问数据库,然后在此基础上使用Endpoint手动来实现一个WebService,最后运用Controller来实现WebService。
创建项目
在PowerShell中运行以下命令,来创建项目的基本框架。
PS D:\Study\ASPNETCORESTUDY> dotnet new globaljson --sdk-version 5.0 --output WebApp
PS D:\Study\ASPNETCORESTUDY> dotnet new web --no-https --output WebApp --framework net5.0
PS D:\Study\ASPNETCORESTUDY> dotnet new sln -o WebApp
PS D:\Study\ASPNETCORESTUDY> dotnet sln WebApp add WebApp
这些命令在之前的文章中介绍过,基本就是先创建一个globaljson配置文件,然后创建项目模板,然后创建解决方案文件,最后将项目加到解决方案中。
添加数据模型
这部分主要是准备数据模型,创建数据库迁移,以及准备测试数据,这里涉及到EntityFramework Core的使用。
Step1:添加EntityFramework Core相关的Nuget包,通过如下命令可以实现,或者通过Nuget包管理器也可以添加,这里通过如下命令进行:
dotnet add package Microsoft.EntityFrameworkCore.Design --version 5.0.7
dotnet add package Microsoft.EntityFrameworkCore.SqlServer --version 5.0.7
然后添加dotnet ef工具来创建和管理EntityFramework的迁移:
dotnet tool uninstall --global  dotnet-ef
dotnet tool install --global dotnet-ef --version 5.0.7
Step2:接下来就是创建数据模型。这个例子包含商品Product,商品类别Category和商品供货商Supplier三个类,在项目目录下新建Models文件夹,分别创建三个类,内容如下。
using System.ComponentModel.DataAnnotations.Schema;
namespace WebApp.Models
{
    public class Product
    {
        public long ProductId { get; set; }
        public string Name { get; set; }
        [Column(TypeName = "decimal(8,2)")]
        public decimal Price { get; set; }

        public long CategoryId { get; set; }
        public Category Category { get; set; }

        public long SupplierId { get; set; }
        public Supplier Supplier { get; set; }
    }
}

using System.Collections.Generic;
namespace WebApp.Models
{
    public class Supplier
    {
        public long SupplierId { get; set; }
        public string Name { get; set; }
        public string City { get; set; }
        public IEnumerable<Product> Products { get; set; }
    }
}

using System.Collections.Generic;
namespace WebApp.Models
{
    public class Category
    {
        public long CategoryId { get; set; }
        public string Name { get; set; }
        public IEnumerable<Product> Products { get; set; }
    }
}
接下来,创建DatabaseContext,用来生成和访问数据库。
using Microsoft.EntityFrameworkCore;
namespace WebApp.Models
{
    public class DataContext : DbContext
    {
        public DataContext(DbContextOptions<DataContext> opts) : base(opts)
        {

        }

        public DbSet<Product> Products { get; set; }
        public DbSet<Category> Categories { get; set; }
        public DbSet<Supplier> Suppliers { get; set; }
    }
}
Step3:初始化测试数据,新建SeedData类,准备用于测试的数据。
using Microsoft.EntityFrameworkCore;
using System.Linq;
namespace WebApp.Models
{
    public static class SeedData
    {
        public static void SeedDatabase(DataContext context)
        {
            context.Database.Migrate();
            if (context.Products.Count() == 0 && context.Suppliers.Count() == 0 && context.Categories.Count() == 0)
            {
                Supplier s1 = new Supplier { Name = "Splash Dudes", City = "San Jose" };
                Supplier s2 = new Supplier { Name = "Soccer Town", City = "Chicago" };
                Supplier s3 = new Supplier { Name = "Chess Co", City = "New York" };
                Category c1 = new Category { Name = "Watersports" };
                Category c2 = new Category { Name = "Soccer" };
                Category c3 = new Category { Name = "Chess" };

                context.Products.AddRange(
                new Product
                {
                    Name = "Kayak",
                    Price = 275,
                    Category = c1,
                    Supplier = s1
                }, new Product
                {
                    Name = "Lifejacket",
                    Price = 48.95m,
                    Category = c1,
                    Supplier = s1
                },
                new Product
                {
                    Name = "Soccer Ball",
                    Price = 19.50m,
                    Category = c2,
                    Supplier = s2
                },
                new Product
                {
                    Name = "Corner Flags",
                    Price = 34.95m,
                    Category = c2,
                    Supplier = s2
                },
                new Product
                {
                    Name = "Stadium",
                    Price = 79500,
                    Category = c2,
                    Supplier = s2
                },
                new Product
                {
                    Name = "Thinking Cap",
                    Price = 16,
                    Category = c3,
                    Supplier = s3
                },
                new Product
                {
                    Name = "Unsteady Chair",
                    Price = 29.95m,
                    Category = c3,
                    Supplier = s3
                },
                new Product
                {
                    Name = "Human Chess Board",
                    Price = 75,
                    Category = c3,
                    Supplier = s3
                },
                new Product
                {
                    Name = "Bling-Bling King",
                    Price = 1200,
                    Category = c3,
                    Supplier = s3
                });
                context.SaveChanges();
            }
        }
    }
}
SeedData会将所有的变更应用到数据库,然后初始化数据库里的数据。EntityFramework会自动帮我们生成对象之间的引用关系,比如主键和外键的对应关系。
Step4:配置EntityFrameworkCore和相关服务。现在需要配置数据库连接字符串,以及将数据库字符串配置到应用中。
using System;
using System.Collections.Generic;
using System.Linq;
using System.Threading.Tasks;
using Microsoft.AspNetCore.Builder;
using Microsoft.AspNetCore.Hosting;
using Microsoft.AspNetCore.Http;
using Microsoft.Extensions.DependencyInjection;
using Microsoft.Extensions.Hosting;
using Microsoft.Extensions.Configuration;
using Microsoft.EntityFrameworkCore;
using WebApp.Models;

namespace WebApp
{
    public class Startup
    {
        public IConfiguration Configuration { get; set; }
        public Startup(IConfiguration config)
        {
            Configuration = config;
        }

        public void ConfigureServices(IServiceCollection services)
        {
            services.AddDbContext<DataContext>(opts =>
            {
                opts.UseSqlServer(Configuration["ConnectionStrings:ProductConnection"]);
                opts.EnableSensitiveDataLogging(true);
            });
        }

        public void Configure(IApplicationBuilder app, IWebHostEnvironment env, DataContext dbContext)
        {
            app.UseDeveloperExceptionPage();
            app.UseRouting();
            app.UseEndpoints(endpoints =>
            {
                endpoints.MapGet("/", async context =>
                {
                    await context.Response.WriteAsync("Hello World!");
                });
            });
            SeedData.SeedDatabase(dbContext);
        }
    }
}
然后,在配置文件 appsettings.json 中,添加ConnectionString:ProductConnection键。
{
  "Logging": {
    "LogLevel": {
      "Default": "Information",
      "Microsoft": "Warning",
      "Microsoft.Hosting.Lifetime": "Information",
      "Microsoft.EntityFrameworkCore": "Information"
    }
  },
  "AllowedHosts": "*",
  "ConnectionStrings": {
    "ProductConnection": "Server=DESKTOP-CUQU48I\\SQLEXPRESS;Database=Products;MultipleActiveResultSets=true;;Trusted_Connection=True;"
  }
}
Step5:创建和应用迁移,通过一下命令,可以创建和应用迁移到数据库。
PS D:\Study\ASPNETCORESTUDY\WebApp> dotnet ef migrations add Initial
PS D:\Study\ASPNETCORESTUDY\WebApp> dotnet ef database update
当然,还可以使用以下命令来重置数据库:
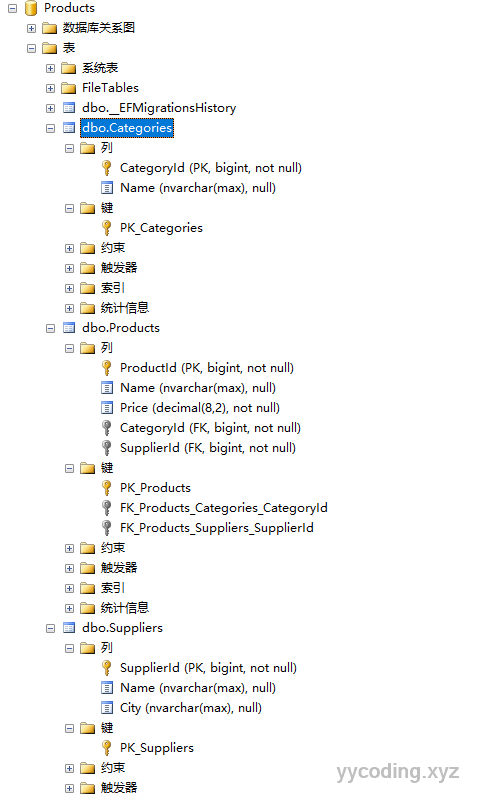
dotnet ef database drop --force执行完成之后,可以去数据库看,相关表以及主键外键都创建好了。
添加CSS框架
后面会编写html代码,所以会用到一些css或者js框架,要管理这些框架,需要一些工具,这里使用的是LibMan,安装LibMan的方法如下:
dotnet tool uninstall --global Microsoft.Web.LibraryManager.Cli
dotnet tool install --global Microsoft.Web.LibraryManager.Cli --version 2.1.113
LibMan安装完成之后,使用下面命令,安装bootstrap。
libman init -p cdnjs
libman install twitter-bootstrap@5.0.2 -d wwwroot/lib/twitter-bootstrap
配置请求管道
为了方便测试,这里创建一个请求的Middleware来测试。新建TestMiddleware.cs类,内容如下:
using Microsoft.AspNetCore.Http;
using System.Linq;
using System.Threading.Tasks;
using WebApp.Models;

namespace WebApp
{
    public class TestMiddleware
    {
        private RequestDelegate nextDelegate;

        public TestMiddleware(RequestDelegate next)
        {
            nextDelegate = next;
        }

        public async Task Invoke(HttpContext context, DataContext dataContext)
        {
            if (context.Request.Path == "/test")
            {
                await context.Response.WriteAsync($"There are {dataContext.Products.Count()} products\n");
                await context.Response.WriteAsync($"There are {dataContext.Categories.Count()} categories\n");
                await context.Response.WriteAsync($"There are {dataContext.Suppliers.Count()} suppliers\n");
            }
            else
            {
                await nextDelegate(context);
            }
        }
    }
}
这个类里面,当用户请求/test的时候,会打印出来数据库中的数据条数。接下来,还需在Startup.cs的Configure方法里,添加如下代码:
public void Configure(IApplicationBuilder app, IWebHostEnvironment env, DataContext dbContext)
{
    app.UseDeveloperExceptionPage();
    app.UseRouting();
    app.UseMiddleware<TestMiddleware>();
    app.UseEndpoints(endpoints =>
    {
        endpoints.MapGet("/", async context =>
        {
            await context.Response.WriteAsync("Hello World!");
        });
    });

    SeedData.SeedDatabase(dbContext);
}
运行程序
在使用Visual Studio Code编写代码的时候,通常在每完成一个类的时候,都会使用dotnet build编译一下,如果发现错误,修正。当所有代码写完成之后,运行dotnet run即可运行程序,可以看到结果如下:
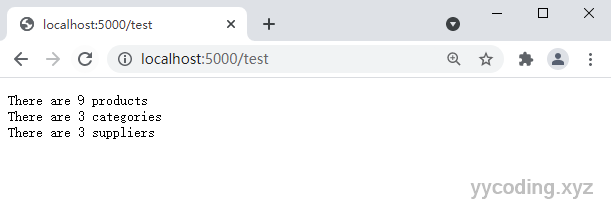 表示整个程序已经跑起来没问题了。
什么是RESTful Web Services
WebService简单来说就是能够响应HTTP请求并返回数据,这些数据能够被客户程序使用比如JavaScript程序,如何编写WebService没有统一标准,但是应用最广泛的方法是使用表述性状态转移(Representational State Transfer,REST)模式,基于这种方法编写的WebService,我们称之为RESTfull Web Services。
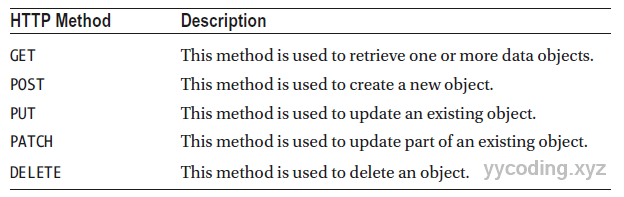
REST的核心是通过结合HTTP请求的URL和请求的方法比如GET、POST来定义API,URL里面包含请求的数据或对象,方法表示要执行何种操作。比如,对于如下请求:
/api/products/1在URL中包含了Product对象的ProductID=1,但是他没有表示该执行何种操作。如何操作有HTTP谓词来进行确定,HTTP方法以及对应的操作如下:
使用自定义Endpoint来实现一个WebService
要手动实现WebService,实际上就是对HttpContext的Response进行操作,这里可以定义一个WebServiceEndpoint.cs的类,然后内容如下。
using Microsoft.AspNetCore.Http;
using Microsoft.AspNetCore.Routing;
using Microsoft.Extensions.DependencyInjection;
using System.Collections.Generic;
using System.Text.Json;
using WebApp.Models;
namespace Microsoft.AspNetCore.Builder
{
    public static class WebServiceEndpoint
    {
        private static string BASEURL = "/api/products";

        public static void MapWebService(this IEndpointRouteBuilder app)
        {
            app.MapGet($"{BASEURL}/{{id}}", async context =>
            {
                long key = long.Parse(context.Request.RouteValues["id"] as string);
                DataContext data = context.RequestServices.GetService<DataContext>();
                Product p = data.Products.Find(key);
                if (p == null)
                {
                    context.Response.StatusCode = StatusCodes.Status404NotFound;
                }
                else
                {
                    context.Response.ContentType = "application/json";
                    await context.Response.WriteAsync(JsonSerializer.Serialize<Product>(p));
                }
            });

            app.MapGet(BASEURL, async context =>
            {
                DataContext data = context.RequestServices.GetService<DataContext>();
                context.Response.ContentType = "application/json";
                await context.Response.WriteAsync(JsonSerializer.Serialize<IEnumerable<Product>>(data.Products));
            });

            app.MapPost(BASEURL, async context =>
            {
                DataContext data = context.RequestServices.GetService<DataContext>();
                Product p = await JsonSerializer.DeserializeAsync<Product>(context.Request.Body);
                await data.AddAsync(p);
                await data.SaveChangesAsync();
                context.Response.StatusCode = StatusCodes.Status200OK;
            });
        }
    }
}
可以看到,上述基本就是在手动设置context.Response的属性。最后在Startup.cs的Configure方法中添加该Endpoint:
public void Configure(IApplicationBuilder app, IWebHostEnvironment env, DataContext dbContext)
{
app.UseDeveloperExceptionPage();
app.UseRouting();
app.UseMiddleware<TestMiddleware>();
app.UseEndpoints(endpoints =>
{
endpoints.MapGet("/", async context =>
{
await context.Response.WriteAsync("Hello World!");
});
endpoints.MapWebService();
});
SeedData.SeedDatabase(dbContext);
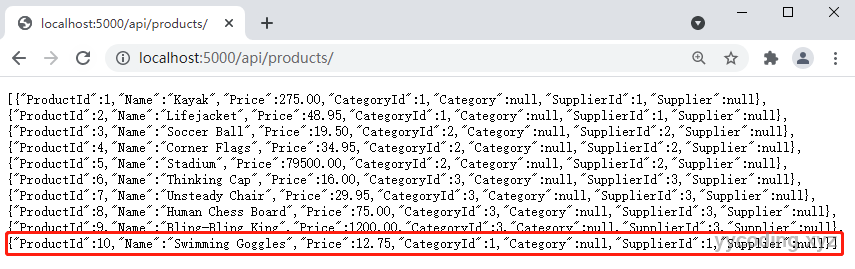
}最后运行程序,可以看到对于两个Get方法,我们可以直接在浏览器里面测试,结果如下:
 要测试POST方法,我们可以使用一些工具,比如POSTMAN来进行,这里我们使用PowerShell里面的Invoke-RestMethod来通过命令进行。
PS D:\Study\ASPNETCORESTUDY> Invoke-RestMethod http://localhost:5000/api/products -Method POST -Body (@{Name="Swimming Goggles";Price=12.75;CategoryId=1;SupplierId=1}|ConvertTo-Json) -ContentType "application/json"通过上述Post方法,新建了一个Product对象,接下来通过Get方法刷新一下,就能看到新添加的对象。
使用Controller来创建WebService
上面使用Endpoint来手动操作Response的方式比较原始,他存在一些重复的步骤,比如首先获取EntityFramework服务,设置ContentType类型,序列化对象为JSON等等操作,代码重复,且不够优雅等缺点。
一种更好的方式,是使用Controller来实现,它使得我们能够在单独的类里定义所有的WebService操作。Controller控制器是MVC框架的一部分,他建立在ASP.NET Core基础之上,他能够处理用类似我们在上面的Endpoint的方式那样来处理HTTP请求。
要开启Controller,需要修改Startup方法里的CongfigureService和Configure方法,修改如下:
using System;
using System.Collections.Generic;
using System.Linq;
using System.Threading.Tasks;
using Microsoft.AspNetCore.Builder;
using Microsoft.AspNetCore.Hosting;
using Microsoft.AspNetCore.Http;
using Microsoft.Extensions.DependencyInjection;
using Microsoft.Extensions.Hosting;
using Microsoft.Extensions.Configuration;
using Microsoft.EntityFrameworkCore;
using WebApp.Models;

namespace WebApp
{
    public class Startup
    {
        public IConfiguration Configuration { get; set; }
        public Startup(IConfiguration config)
        {
            Configuration = config;
        }
        public void ConfigureServices(IServiceCollection services)
        {
            services.AddDbContext<DataContext>(opts =>
            {
                opts.UseSqlServer(Configuration["ConnectionStrings:ProductConnection"]);
                opts.EnableSensitiveDataLogging(true);
            });
            services.AddControllers();
        }
        public void Configure(IApplicationBuilder app, IWebHostEnvironment env, DataContext dbContext)
        {
            app.UseDeveloperExceptionPage();
            app.UseRouting();
            app.UseMiddleware<TestMiddleware>();
            app.UseEndpoints(endpoints =>
            {
                endpoints.MapGet("/", async context =>
                {
                    await context.Response.WriteAsync("Hello World!");
                });

                //endpoints.MapWebService();
                endpoints.MapControllers();
            });

            SeedData.SeedDatabase(dbContext);
        }
    }
}
主要是services.AddControllers() 和 endpoints.MapControllers()方法。
创建Controller
在Controllers文件夹下面新建ProductsController.cs类,内容如下:
using Microsoft.AspNetCore.Mvc;
using WebApp.Models;
using System.Collections.Generic;
using Microsoft.Extensions.Logging;
using System.Linq;

namespace WebApp.Controllers
{

    [Route("api/[controller]")]
    public class ProductsController : ControllerBase
    {
        private DataContext context;
        public ProductsController(DataContext ctx)
        {
            context = ctx;
        }

        [HttpGet]
        public IEnumerable<Product> GetProducts()
        {
            return context.Products;
        }

        [HttpGet("{id}")]
        public Product GetProduct(long id, [FromServices] ILogger<ProductsController> logger)
        {
            logger.LogDebug("GetProduct action invoked");
            return context.Products.Find(id);
        }

        [HttpPost]
        public void SaveProduct([FromBody] Product product)
        {
            context.Products.Add(product);
            context.SaveChanges();
        }

        [HttpPut]
        public void UpdateProduct([FromBody] Product product)
        {
            context.Products.Update(product);
            context.SaveChanges();
        }

        [HttpDelete("{id}")]
        public void DeleteProduct(long id)
        {
            context.Products.Remove(new Product { ProductId = id });
            context.SaveChanges();
        }

    }
}
ProductsController继承自ControllerBase,这个基类提供了一系列访问MVC框架以及ASP.NET Core平台的特性。它包含以下重要属性。
| HttpContext | 返回当前请求的HttpContext对象 |
| ModelState | 用于返回对参数验证的详情 |
| Request | 返回当前请求的HttpRequest对象 |
| Response | 返回当前返回的HttpResponse对象 |
| RouteData | 返回从Url中获取的路由信息 |
| User | 返回当前请求的User对象 |
- ProductController前面的[Route("api/[controller]")] 属性用来指定请求的URL地址。这里表示请求的地址为 api/products,[controller]提取的是ProductController中不带Controller后缀部分。
- 方法前面的[HttpPost]、[HttpGet]、[HttpPut]、[HttpDelete]属性,代表不同的HTTP请求谓词,其余的谓词还包括HttpPatch、HttpHead、AcceptVerbs(表示可以接受多个HTTP谓词)。
- 在GetProduct方法前面的[HttpGet("{id}")]属性,这里面id会从api/products/{id},中提取id参数,然后赋值给GetProduct方法的第一个参数。这里,对于同样使用HttpGet请求,如果URL为api/products,则会请求GetProducts()方法,如果URL为api/products/{id},则会请求GetProduct(id,logger)方法。
- GetProduct方法的返回值为Product类型,可以看到运行程序后,输出的已经是JSON序列化后的对象。Controller会帮我们处理好序列化问题,而不是在之前的Endpoint中,我们需要首先设置Content-Type属性,然后再手动序列化对象,然后写入到Response中,Controller帮助我们完成了很多工作。
- 在ProductsController的构造函数中,我们通过依赖注入,注入了DataContext对象,通过该对象可以访问数据库。这里对于每个ProductsController实例,我们共用了同一个DatacContext对象。
- 如果要在Action方法中使用依赖注入,必须要在方法的参数类型前面加上[FromServices]标签,比如在GetProduct方法中,我们使用了ILogger<ProductsController>对象,所以该方法的签名为 public Product GetProduct([FromServices] ILogger<ProductsController> logger)
- 默认情况下MVC框架会试图从URL中获取参数的值,但是使用[FromServices]会覆盖这一行为。在有一些比如HttpPost的方法中,我们期望从Body中获取参数值,这里就需要用到[FromBody]标签来修饰了,比如在SaveProduct方法中,我们需要从HttpPost的Body中获取Product对象,所以该方法的签名为:SaveProduct([FromBody]Product product)。这里面同时会用到模型绑定,在UpdateProduct方法中也是如此。
运行上述程序,我们可以看到其表现行为跟我们之前手动编写的Endpoint是一致的,现在我们使用Invoke-RestMethod来测试一下其他几个方法,首先是Post方法,添加对象。
Invoke-RestMethod http://localhost:5000/api/products -Method POST -Body (@{Name="Soccer Boots";Price=89.99;CategoryId=2;SupplierId=2}|ConvertTo-Json) -ContentType "application/json"  接着是测试UpdateProduct方法,修改了ProductId=1对象的Name属性。
Invoke-RestMethod http://localhost:5000/api/products -Method PUT -Body (@{ProductId=1;Name="Green Kayak";Price=275;CategoryId=1;SupplierId=1}|ConvertTo-Json) -ContentType "application/json" 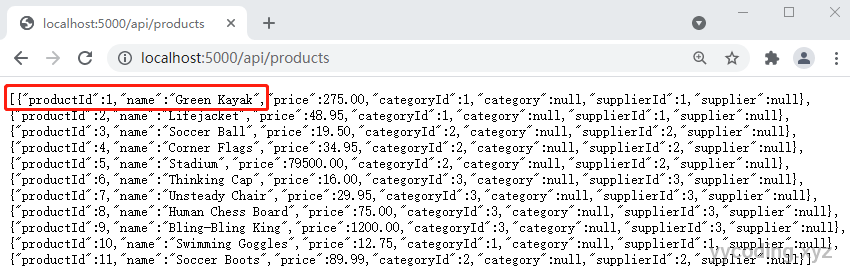
接下来是删除对象。这里删除ProductId为2的对象,可以看到执行命令之后,再次刷新后ProductId为2的对象已经不存在了:
Invoke-RestMethod http://localhost:5000/api/products/2 -Method DELETE 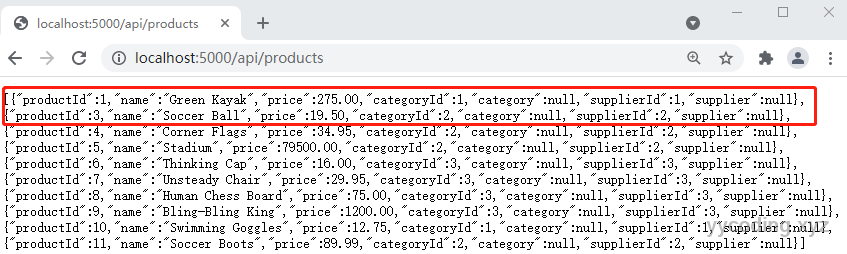
WebService实现的改进
前面已经演示了使用Controller来实现WebService,但是这里面仍然有可以改进的地方。首先是,添加对跨域请求的支持,需要引用 Microsoft.AspNetCore.Cors.Infrastructure 命名空间,然后在Startup的ConfigureService方法中添加如下:
services.AddCors();使用异步Action
ASP.NET Core是使用线程池来处理每一个请求的。能同时处理请求的数量收到线程池大小的限制,当线程池里的某个线程正在等待某个请求处理返回结果之前,他不能处理其他请求。在一些依赖外部请求资源的Action中可能会导致额外的时间等待,比如当Action在访问数据库。这种问题可以通过异步的Action来解决。它使得当前处理某个Action的线程可以处理其他请求而不是阻塞在那里一直等待结果返回,虽然异步Action并不能增加处理某个Action的速度,但这能够增加应用的吞吐量。对ProductsController的异步改造如下:
using Microsoft.AspNetCore.Mvc;
using WebApp.Models;
using System.Collections.Generic;
using Microsoft.Extensions.Logging;
using System.Linq;
using System.Threading.Tasks;

namespace WebApp.Controllers
{

    [Route("api/[controller]")]
    public class ProductsController : ControllerBase
    {
        private DataContext context;
        public ProductsController(DataContext ctx)
        {
            context = ctx;
        }

        [HttpGet]
        public IAsyncEnumerable<Product> GetProducts()
        {
            return context.Products;
        }

        [HttpGet("{id}")]
        public async Task<Product> GetProduct(long id, [FromServices] ILogger<ProductsController> logger)
        {
            logger.LogDebug("GetProduct action invoked");
            return await context.Products.FindAsync(id);
        }

        [HttpPost]
        public async Task SaveProduct([FromBody] Product product)
        {
            await context.Products.AddAsync(product);
            await context.SaveChangesAsync();
        }

        [HttpPut]
        public async Task UpdateProduct([FromBody] Product product)
        {
            context.Products.Update(product);
            await context.SaveChangesAsync();
        }

        [HttpDelete("{id}")]
        public async Task DeleteProduct(long id)
        {
            context.Products.Remove(new Product { ProductId = id });
            await context.SaveChangesAsync();
        }

    }
}
可以看到,异步化的修改很简单:
- 将返回类型从IEnumerable修改为IAsyncEnumerable。
- 将Void改为async Task。
- 将EntityFrameowrkCore提供了操作数据库的异步方法,所以将同步的改为异步方法,FindAsync,AddAsync,SaveChangesAsync,这些异步方法都需要添加await修饰。需要注意的是有些方法没有对应的异步方法,比如Remove,Update。
阻止过度绑定
一些方法可以使用模型绑定,来从请求的Body中获取绑定后的对象来执行一些操作。比如SaveProduct方法。如果使用如下命令来创建方法时,会报错。
Invoke-RestMethod http://localhost:5000/api/products -Method POST -Body (@{ProductId=100;Name="swim Buoy";Price=19.99;CategoryId=1;SupplierId=1}|ConvertTo-Json) -ContentType "application/json" 报错信息如下:
Microsoft.AspNetCore.Diagnostics.DeveloperExceptionPageMiddleware[1]
      An unhandled exception has occurred while executing the request.
      Microsoft.EntityFrameworkCore.DbUpdateException: An error occurred while updating the entries. See the inner exception for details.
       ---> Microsoft.Data.SqlClient.SqlException (0x80131904): 当 IDENTITY_INSERT 设置为 OFF 时,不能为表 'Products' 中的标识列插入显式值。
在默认情况下EntityFramework Core会让数据库来自动生成主键Id值,这有个好处是当有多个应用同时创建对象的时候,可以不用协调,让数据库来自动生成。在模型绑定中,Product对象需要ProductId属性,但是在创建Product对象的时候,ProductId是不需要我们给他赋值的。如果赋值,那么就会报如上错误,当然也可以把ProductId赋值为0。
这种就是所谓的过度绑定,最安全的解决办法是,我们重新定义一个单独的数据模型类,来用于模型绑定。比如这里我们在WebApp/Models文件夹下定义一个ProductBindingTarget.cs类。
namespace WebApp.Models
{
    public class ProductBindingTarget
    {
        public string Name { get; set; }
        public decimal Price { get; set; }
        public long CategoryId { get; set; }
        public long SupplierId { get; set; }
        public Product ToProduct() => new Product
        {
            Name = this.Name,
            Price = this.Price,
            CategoryId = this.CategoryId,
            SupplierId = this.SupplierId
        };
    }
}
然后修改SaveProduct方法的接受的参数类型为ProductBindingTarget,如下:
[HttpPost]
public async Task SaveProduct([FromBody] ProductBindingTarget target)
{
await context.Products.AddAsync(target.ToProduct());
await context.SaveChangesAsync();
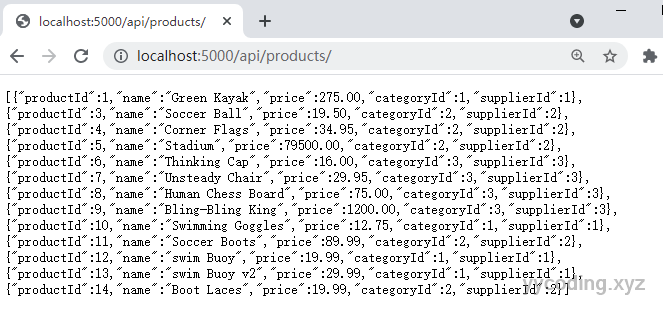
}这样,运行下面的测试方法,即使在请求的Body里面提供了我们不想要的ProductId,该方法仍能够正常运行。
Invoke-RestMethod http://localhost:5000/api/products -Method POST -Body (@{ProductId=100;Name="swim Buoy v2";Price=29.99;CategoryId=1;SupplierId=1}|ConvertTo-Json)
-ContentType "application/json"
使用Action结果返回值
MVC框架会帮助我们自动设置返回状态码,但有时候它返回的状态码可能不是我们想要的,比如下面这个,我们利用HttpGet请求一个不存在的对象:
PS D:\Study\ASPNETCORESTUDY> Invoke-WebRequest http://localhost:5000/api/products/1000 |Select-Object StatusCode

StatusCode
----------
       204
他返回的是204代码。当查询数据库中ProductId为1000的对象时,返回的是null,当MVC判断返回结果为null的时候,他就会设置StatusCode为204,表示请求成功执行了,但是没有产生任何数据。并不是所有的应用都需要这种默认的结果,一个很通常的需求是我们需要返回一个404错误,表示资源未找到。
同样,在SaveProducts方法中,当成功保存一个对象后,MVC会返回200状态码,但是用户并不知道创建完Product对象后,数据库帮我们自动生成的ProductId,这就需要我们重新去查询一下才知道刚创建的对象的Id是多少。
在MVC中,Action方法可以返回一个实现了IActionResult接口的对象,通过返回这些对象我们不需要手动操作HttpResponse对象了。ControllBase提供了一系列方法来创建ActionResult对象,这些方法如下:
 可以看到,当返回的值为null的时候,实际上是返回了一个NoContent对象,我们对ProductController中GetProduct和SaveProduct进行如下修改:
[HttpGet("{id}")]
public async Task<IActionResult> GetProduct(long id, [FromServices] ILogger<ProductsController> logger)
{
    Product p = await context.Products.FindAsync(id);
    if (p == null)
    {
        return NotFound();
    }
    logger.LogDebug("GetProduct action invoked");
    return Ok(p);
}

[HttpPost]
public async Task<IActionResult> SaveProduct([FromBody] ProductBindingTarget target)
{
    Product p = target.ToProduct();
    await context.Products.AddAsync(p);
    await context.SaveChangesAsync();
    return Ok(p);
}
修改之后,重新运行,再次请求一个不存在的对象,会发现返回值变成了404,请求存在的对象就是200。
PS D:\Study\ASPNETCORESTUDY> Invoke-WebRequest http://localhost:5000/api/products/1000 |Select-Object StatusCode
Invoke-WebRequest : 远程服务器返回错误: (404) 未找到。
所在位置 行:1 字符: 1
+ Invoke-WebRequest http://localhost:5000/api/products/1000 |Select-Obj ...
+ ~~~~~~~~~~~~~~~~~~~~~~~~~~~~~~~~~~~~~~~~~~~~~~~~~~~~~~~~~
    + CategoryInfo          : InvalidOperation: (System.Net.HttpWebRequest:HttpWebRequest) [Invoke-WebRequest],WebException
    + FullyQualifiedErrorId : WebCmdletWebResponseException,Microsoft.PowerShell.Commands.InvokeWebRequestCommand

PS D:\Study\ASPNETCORESTUDY> Invoke-WebRequest http://localhost:5000/api/products/10 |Select-Object StatusCode

StatusCode
----------
       200
同时,创建对象的时候,也能返回一个包含了ProductId值的新的对象:
PS D:\Study\ASPNETCORESTUDY> Invoke-RestMethod http://localhost:5000/api/products -Method POST -Body (@{Name="Boot Laces"; Price=19.99;CategoryId=2; SupplierId=2} | ConvertTo-Json) -ContentType "application/json"

productId  : 14
name       : Boot Laces
price      : 19.99
categoryId : 2
category   :
supplierId : 2
supplier   :
执行跳转
有时候请求会跳转到其他URL,最简单的方法是调用Redirect方法,方法如下:
[HttpGet("redirect")]
public IActionResult Redirect()
{
    return Redirect("/api/products/1");
}
现在,请求一下:
PS D:\Study\ASPNETCORESTUDY> Invoke-RestMethod http://localhost:5000/api/products/redirect

productId  : 1
name       : Green Kayak
price      : 275.00
categoryId : 1
category   :
supplierId : 1
supplier   :
除了直接编写url之外,还可以使用RedirectToAction方法,它会跳转到当前Controller的指定的Action,并且给与参数,比如:
[HttpGet("redirect")]
public IActionResult Redirect() {
    return RedirectToAction(nameof(GetProduct), new { Id = 1 });
}
也可以使用RedirectToRoute来实现如下功能:
[HttpGet("redirect")]
public IActionResult Redirect() {
    return RedirectToRoute(new { controller = "Products", action = "GetProduct", Id = 1});
}
数据校验
当接收用户从表单上输入的数据时,我们需要首先进行校验。在MVC框架中,提供了校验的特性,首先需要做的是,我们需要在数据绑定对象上添加校验标记。
using System.ComponentModel.DataAnnotations;
namespace WebApp.Models
{
    public class ProductBindingTarget
    {
        [Required]
        public string Name { get; set; }
        [Range(1, 1000)]
        public decimal Price { get; set; }
        [Range(1, long.MaxValue)]
        public long CategoryId { get; set; }
        [Range(1, long.MaxValue)]
        public long SupplierId { get; set; }
        public Product ToProduct() => new Product
        {
            Name = this.Name,
            Price = this.Price,
            CategoryId = this.CategoryId,
            SupplierId = this.SupplierId
        };
    }
}
接下来,在SaveProduct的时候,判断校验状态:
[HttpPost]
public async Task<IActionResult> SaveProduct([FromBody] ProductBindingTarget target)
{
    if (ModelState.IsValid)
    {
        Product p = target.ToProduct();
        await context.Products.AddAsync(p);
        await context.SaveChangesAsync();
        return Ok(p);
    }
    return BadRequest(ModelState);
}
ModelState是ControllerBase里面的属性,当模型绑定校验无误时,返回true,否则返回false,现在运行应用。
PS D:\Study\ASPNETCORESTUDY> Invoke-WebRequest http://localhost:5000/api/products -Method POST -Body (@{Name="Boot Laces"} |
>> ConvertTo-Json) -ContentType "application/json"
Invoke-WebRequest : 远程服务器返回错误: (400) 错误的请求。
所在位置 行:1 字符: 1
+ Invoke-WebRequest http://localhost:5000/api/products -Method POST -Bo ...
+ ~~~~~~~~~~~~~~~~~~~~~~~~~~~~~~~~~~~~~~~~~~~~~~~~~~~~~~~~~~~~~~~~~~~~~
    + CategoryInfo          : InvalidOperation: (System.Net.HttpWebRequest:HttpWebRequest) [Invoke-WebRequest],WebException
    + FullyQualifiedErrorId : WebCmdletWebResponseException,Microsoft.PowerShell.Commands.InvokeWebRequestCommand
可以看到,返回的是400 BadRequest。
使用ApiController属性
在Controller上使用ApiController属性可以在模型绑定和验证上简化很多操作和行为。比如在参数中使用的[FromBody]属性以及在SaveProduct中判断ModelState.IsValide的逻辑,现在都可以省略。修改后的ProductsController如下:
using Microsoft.AspNetCore.Mvc;
using WebApp.Models;
using System.Collections.Generic;
using Microsoft.Extensions.Logging;
using System.Linq;
using System.Threading.Tasks;

namespace WebApp.Controllers
{

    [ApiController]
    [Route("api/[controller]")]
    public class ProductsController : ControllerBase
    {
        private DataContext context;
        private ILogger<ProductsController> logger;
        public ProductsController(DataContext ctx, ILogger<ProductsController> l)
        {
            context = ctx;
            logger = l;
        }

        [HttpGet]
        public IAsyncEnumerable<Product> GetProducts()
        {
            return context.Products;
        }

        [HttpGet("{id}")]
        public async Task<IActionResult> GetProduct(long id)
        {
            Product p = await context.Products.FindAsync(id);
            if (p == null)
            {
                return NotFound();
            }
            logger.LogDebug("GetProduct action invoked");
            return Ok(p);
        }

        [HttpPost]
        public async Task<IActionResult> SaveProduct(ProductBindingTarget target)
        {
            Product p = target.ToProduct();
            await context.Products.AddAsync(p);
            await context.SaveChangesAsync();
            return Ok(p);
        }

        [HttpPut]
        public async Task UpdateProduct(Product product)
        {
            context.Products.Update(product);
            await context.SaveChangesAsync();
        }

        [HttpDelete("{id}")]
        public async Task DeleteProduct(long id)
        {
            context.Products.Remove(new Product { ProductId = id });
            await context.SaveChangesAsync();
        }

        [HttpGet("redirect")]
        public IActionResult Redirect()
        {
            return RedirectToAction(nameof(GetProduct), new { Id = 1 });
        }

    }
}
需要注意的是,这里ILogger移到构造函数里了。要打印出debug级别的日志,需要修改日志里面的级别从"Information”修改为“Debug”。
{
  "Logging": {
    "LogLevel": {
      "Default": "Debug",
      "Microsoft": "Warning",
      "Microsoft.Hosting.Lifetime": "Information"
    }
  }
}
忽略Null属性
最后一步的修改是移除掉返回值里面是null的属性字段。在EntityFrameowrk Core模型中,因为涉及要外键的引用,所以会有很多不需要赋值或者返回的对象。比如我们请求Product详情对象时:
PS D:\Study\ASPNETCORESTUDY> Invoke-WebRequest http://localhost:5000/api/products/1 | Select-Object Content

Content
-------
{"productId":1,"name":"Green Kayak","price":275.00,"categoryId":1,"category":null,"supplierId":1,"supplier":null}
会看到返回值里面,有很多的null对象。解决方法有两种,一种是返回一个新的匿名对象,只返回需要的字段。另外一种是配置Json序列化参数。
返回新的匿名对象
现在修改GetProduct方法,在返回的方法里面返回匿名对象,指给需要的字段赋值。
[HttpGet("{id}")]
public async Task<IActionResult> GetProduct(long id)
{
    Product p = await context.Products.FindAsync(id);
    if (p == null)
    {
        return NotFound();
    }
    logger.LogDebug("GetProduct action invoked");
    return Ok(new
    {
        ProductId = p.ProductId,
        Name = p.Name,
        Price = p.Price,
        CategoryId = p.CategoryId,
        SupplierId = p.SupplierId
    });
}
重新运行,可以看到结果如下,多余的字段已经没有了。

JSON序列化配置
还有一种方法是,修改JSON序列化的默认行为,忽略为null的字段,修改如下:
public void ConfigureServices(IServiceCollection services)
{
    services.AddDbContext<DataContext>(opts =>
    {
        opts.UseSqlServer(Configuration["ConnectionStrings:ProductConnection"]);
        opts.EnableSensitiveDataLogging(true);
    });
    services.AddControllers();
    services.AddCors();
    services.Configure<JsonOptions>(opts =>
    {
        opts.JsonSerializerOptions.IgnoreNullValues = true;
    });
}
重新运行程序,可以看到,所有为null的值都被忽略了。
总结
这里只是一个学习笔记,练习了使用Visual Studio Code编写ASP.NET Core应用,其中还使用到了EntityFramework Core来访问数据库。最后在此基础上首先手动使用EndPoint实现了简单的web services,最后展示了如何使用MVC的Controller来简化RESTfull web services的开发,希望操作能够能加深自己印象。