在Windows上,基于窗体的应用本质上都是事件驱动的。这些应用不会直接调用某个系统的方法,而是等待系统的输入事件。操作系统将各种输入以事件的方式发送到应用程序的窗体上。每个窗体都有一个函数,叫做窗体过程(Window Procedure),当系统有输入需要传递给相应窗体时,就调用这个窗体过程。
如果位于顶层的窗体,对操作系统发送的消息在几秒的时间内没有做出回应,操作系统会认为该应用没有失去响应。此时操作系统会将该应用的窗体隐藏,并在上面创建一个Ghost窗体,其Z值、大小、位置以及其它元素跟原窗体一样。用户可以移动、调整大小、或者关闭窗体,但实际上原始的应用程序已经无法响应,操作看到的只是Ghost窗体。
既然Windows是通过消息来通知各个窗体应用的,那就先来看Windows消息。
Windows消息
操作系统以消息的形式将相关信息发送到窗体过程上。操作系统和应用程序都能够产生消息。比如当用户键盘输入、移动鼠标或者点击一个滚动条控件,操作系统都会产生相应的输入事件发送给相应的窗体过程来处理。操作系统也会产生相应的事件以回应应用程序对系统的更改。比如当应用程序修改操作系统字体库或者调整自身窗体大小。应用程序也能产生相关消息以指示自己的窗体来执行某些任务或者与其它应用程序的窗体进行通讯。
操作系统将消息发送到窗体过程时携带有4个参数:
- 窗体句柄(window handle),它标识了目标窗体,操作系统应用该句柄来判断哪个窗体应该处理或者接收这条消息。
- 消息标识符(message identifier),这个名称标识了消息的用途。当一个窗体过程收到消息时,它根据消息标识符来决定该如何处理该条消息。比如名为WM_PAINT的消息告诉窗体过程,窗体的客户端区域发生了变更,需要重新绘制。
- 两个消息参数,这些消息参数制定了数据或者数据所处的位置。消息参数所代表的含义需要根据消息标识符来确定。如果消息不需要使用这些消息参数,则可以将它们赋值为NULL。
消息类型可以分为系统定义的消息(System-Defined Messages)和应用定义的消息(Application-Defined Messages),可以通过消息标识符来区分和体现。
系统定义消息
操作系统通过发送(同步Send或者异步Post)系统定义消息来和应用程序进行通讯。系统使用这些消息来控制应用程序的操作已经提供输入信息或者其它消息来供应用程序来处理。应用系统也可以发送系统定义消息。
每一个系统定义的消息都有一个唯一的消息标识符,这些都定义在SDK的头文件中,这些消息通常根据用途以一些前缀开头,比如WM_前缀开头的表示一些通用的系统消息,如WM_PAINT表示需要窗体重绘其内容,WM_TIMER表示定时的消息等等。还有一些常用控件的消息,比如CB和CBN表示ComboBox消息和通知,BCM和BCN表示按钮空间消息和通知等等。更多的系统消息可以查看List Of Windows Messages - WineHQ Wiki,或者Windows SDK头文件
应用定义消息
应用程序通过创建自定义的消息来供自己的窗体使用,或者与其它进程的窗体程序进行通讯。应用程序创建自定义消息后,接收该消息的窗体过程程序必须能够解析该消息并能进行处理。
自定义消息的消息标识符必须遵循一下规则:
- 操作系统定义的消息的消息标识符范围为0x0000至0x03FF (WM_USER-1),这一范围的消息时操作系统保留的,应用程序自定义消息不能使用这一范围的值。对于这一范围内的消息,当使用SendMessage的时候,系统会自动对发送的数据进行marshalling,其它的消息类型需要使用者手动marshalling
- 应用程序可以使用的消息标识符范围为0x4000 (WM_USER) ~ 0x7FFF。这一范围的消息,应用程序可以用来在内部私有窗体类里使用。它不能在整个应用内部使用,因为一些预定义的窗体类已经定义了这个范围内的一些消息,比如一些预定义的控件类比如BUTTON、EDIT、LISTBOX以及COMBOBOX也可能会使用这个范围内的消息。
- 0x8000 (WM_APP) ~ 0xBFFF,应用程序可以使用这个范围内的消息来在内部使用,这一范围内的消息不会和系统消息冲突。
- 0xC000 ~ 0xFFFF,应用程序可以调用RegisterWindowMessage,并传入一个字符串,该函数就会返回一个该范围内的消息标识符,多个应用程序调用该函数传入相同的字符串就会得到相同的消息标识符,所以该范围内的消息适合多个应用程序之间发送消息。
- 大于0xFFFF的消息时系统保留的,不能使用。
消息分发
系统使用两种方法来将消息分发到窗口过程,分别是Post方法和Send方法。
- Post方法,它是将消息放到一个先进先出的消息队列里,系统定义的内存对象用来临时存储这些消息。大部分的消息类型,比如用户的鼠标或键盘输入事件WM_MOUSEOVER、WM_LBUTTONDOWN、WM_KEYDOWN以及WM_CHAR,其他一些消息类型比如定时器WM_TIMER、绘图WM_PAINT、退出消息WM_QUIT类型,都是以Post的方式发送。
- Send方法,它是直接将消息发送到窗体过程。
队列消息
操作系统可以在同一时间显示很多个窗体,为了将鼠标和键盘输入事件分发到合适的窗体,系统使用队列消息。
对于每一个GUI线程,系统维护了一个系统级的消息队列和一个线程级的消息队列。为了避免对于非GUI线程的创建消息队列的开销,所有的线程在创建的时候是没有消息队列的。只有当某个线程第一次调用了某个特定的用户函数时,系统才会为该线程创建特定的消息队列。
当用户点击鼠标或者敲击键盘时,鼠标或键盘的驱动程序将这些输入转化为对应的消息并将它们post到系统消息队列里。系统每次从消息队列里面取出一个消息,然后查看该消息的目标窗体,然后将该消息post到创建该目标窗体的线程的消息队列里。创建该窗体的线程消息队列会收到所有的键盘和鼠标消息。最后该线程会自己的消息队列里面取出消息,然后指导系统将这些消息发送到合适的窗体过程中处理。
除了WM_PAINT、WM_TIMER和WM_QUIT这三种消息,系统总是将消息Post到消息队列的末尾,这能保证这些消息是以先进先出的顺序处理。WM_PAINT、WM_TIMER和WM_QUIT这三种消息,会一直保留在消息队列里,直到消息队列里面没有其它消息之后,他们才会被转发到窗体过程中。另外,一个窗体的多个WM_PAINT消息会合并为单个的WM_PAINT消息,它会将所有的失效的绘图区域合并为单个取余。将WM_PAINT消息合并能勾减少客户区域的重绘次数。
系统通过将一个MSG结构拷贝到线程的消息队列中来达到post消息的目的。MSG结构如下:
typedef struct tagMSG {
  HWND   hwnd;
  UINT   message;
  WPARAM wParam;
  LPARAM lParam;
  DWORD  time;
  POINT  pt;
  DWORD  lPrivate;
} MSG, *PMSG, *NPMSG, *LPMSG;
它包函一个目标窗体句柄、消息标识符、2个性消息参数,post消息时的时间以及鼠标的位置。线程可以通过调用PostMessage方法将消息发送到自己的消息队列,或者通过调用PostThreadMessage方法将消息发送到其它线程的消息队列中。
应用程序可以调用GetMessage方法从消息队列中取出消息。如果只是查看消息,不取出消息,可以调用PeekMessage方法。在从消息队列中提取消息之后,可以调用DispatchMessage来指导系统来将消息发送到窗体过程处理。DispatchMessage传递窗体句柄,消息标识符以及两个参数给窗体过程,它不会传递消息发送的时间和鼠标位置,可以通过调用GetMeesageTime和GetMessagePos这俩函数来获取这些信息。
非队列消息
非队列消息时系统直接将消息发送到目标窗体的窗体过程,它略过系统消息队列和线程消息队列。系统通常发送非队列消息来通知那些影响窗体的事件。例如当用户激活一个新的应用程序窗体,系统就会给这个窗体发送一系列事件,比如告知窗体已经被激活的消息WM_ACTIVATE、告知键盘输入已经被绑定到窗体的消息WM_SETFOCUS以及鼠标光标已经被移动到窗体范围内的WM_SETCURSOR消息。当应用程序调用某些特定的系统函数时,也会产生非队列消息,比如当应用程序调用SetWindowsPos函数来移动窗口时,系统就会发送WM_WINDOWSPOSCHANGED消息。
一些函数比如SendMessage,SendMessageTimeout以及SendNotifyMessage都能发送非系统消息,和Post方法不同,这些方法都是同步的,它会一直等待(或者超时时间达到)才会返回。
消息处理
应用程序必须不断的从线程的消息队列里面取出消息并处理。单UI线程应用程序通常在WinMain主函数里面使用消息循环(Message Loop)来从消息队列里面取出消息,然后将消息发送到对应的窗体过程来处理。
消息循环
一个最简单的消息循环包括在一个函数类调用三个方法:GetFunction、TranslateMessage以及DispatchMessage。当遇到错误时,GetMessage函数会返回-1,所以需要特殊处理。
MSG msg;
BOOL bRet;

while( (bRet = GetMessage( &msg, NULL, 0, 0 )) != 0)
{
    if (bRet == -1)
    {
        // handle the error and possibly exit
    }
    else
    {
        TranslateMessage(&msg);
        DispatchMessage(&msg);
    }
}
基本流程如上。GetMessage方法会从线程的消息队列中取出消息,并将消息拷贝到类型为MSG的结构中。并返回一个非0的值。当遇到WM_QUIT消息时,GetMessage会返回-1,因此退出循环。在单UI线程应用程序中,退出程序的第一个步骤通常就是退出消息循环。应用程序可以调用PostQuitMessage函数,通常是发送一个WM_DESTROY消息到主窗体应用程序的窗体过程中,来结束消息循环。
如果给GetMessage的第二个参数传递一个窗口句柄,那么该方法只会从队列中取出发送到该窗体句柄的消息。也可以给第三第四个参数指定消息标识符范围来过滤消息。比如指定WM_KEYFIRST和WM_KEYLAST可以过滤取出所有键盘相关消息,指定WM_MOUSEFIRST和WM_MOUSELAST可以过滤取出所有鼠标消息。在GetMessage和PeekMessage方法中,指定消息过滤很有用,他可以在所有其它消息处理之前获取某些消息,从而优先处理。
即使一个应用程序包含很多窗体,这个UI线程的对应的消息队列只需要一个消息循环即可。DispatchMessage总是会将消息发送到该应用中的指定窗体。因为在消息队列中的每个MSG消息中都包含了一个窗体句柄,该句柄指定了该消息的归属。
应用程序也可以使用快捷键(Accelerator keys),如果使用了快捷键,则在消息循环里必须调用TranslateAccelerator函数。当用户按下快捷键时,TranslateAccelarator判断键盘按下的键是否是预先定义的快捷键,如果是,则将其转换为WM_SYSCOMMAND或WM_COMMAND消息。当用TranslateAccelerator返回值不为0,则表示处理成功,该键盘事件已经被转换为了系统命名消息,在这种情况下不应该再调用TranslateMessage方法。下面是一例使用TranslateAccekerator代码的示例:
MSG msg;
BOOL bRet;

while ( (bRet = GetMessage(&msg, (HWND) NULL, 0, 0)) != 0)
{
    if (bRet == -1)
    {
        // handle the error and possibly exit
    }
    else
    {
        // Check for accelerator keystrokes.

        if (!TranslateAccelerator(
                hwndMain,      // handle to receiving window
                haccel,        // handle to active accelerator table
                &msg))         // message data
        {
            TranslateMessage(&msg);
            DispatchMessage(&msg);
        }
    }
}
窗体过程
窗体过程实际上是一个接收和处理所有发送到该窗体的函数。每一个窗体类都有一个窗体过程,同一个类产生的窗体实体都有相同的窗体过程。
系统将消息发送给窗体过程是通过将消息作为参数来传递实现的。窗体过程根据接受到的消息来对消息做适当的处理,在处理消息的时候,它会检查消息标识符,以及使用消息参数中携带的信息。
窗体过程通常不会忽略某个消息。如果它不处理某条消息,它必须将消息发送回系统,让系统来做缺省处理。窗体过程通过调用DefWindowsProc方法来执行缺省处理,并返回消息结果。窗体过程必须返回该方法返回的值作为该方法返回值。大多数窗体过程只处理少数的特定消息,然后将其它消息通过调用DefWindowProc来返回给系统。
Winform中的消息系统
C#中的Winform也是一个由消息系统驱动的单UI线程应用程序。当创建一个Winform应用程序模板时,在Program.cs中可以看到以下代码:
static class Program
{
    /// <summary>
    /// The main entry point for the application.
    /// </summary>
    [STAThread]
    static void Main()
    {
        Application.EnableVisualStyles();
        Application.SetCompatibleTextRenderingDefault(false);
        Application.Run(new Main());
    }
}其中最主要的就是Application.Run,这句代码就是在当前线程上开启一个标准的应用程序消息循环。其方法原型如下:
/// <include file='doc\Application.uex' path='docs/doc[@for="Application.Run1"]/*' />
/// <devdoc>
///    <para>Begins running a standard application message loop on the current
///       thread, and makes the specified form visible.</para>
/// </devdoc>
public static void Run(Form mainForm)
{
    ThreadContext.FromCurrent().RunMessageLoop(NativeMethods.MSOCM.msoloopMain, new ApplicationContext(mainForm));
}Application的源代码可以查看这里,上述的RunMessageLoop方法的调用路径如下:
RunMessageLoop->RunMessageLoopInner->LocalModalMessageLoop。
其中最主要的逻辑在LocalModalMessageLoop里。
private bool LocalModalMessageLoop(Form form)
{
    try
    {
        // Execute the message loop until the active component tells us to stop.
        //
        NativeMethods.MSG msg = new NativeMethods.MSG();
        bool unicodeWindow = false;
        bool continueLoop = true;

        while (continueLoop)
        {

            bool peeked = UnsafeNativeMethods.PeekMessage(ref msg, NativeMethods.NullHandleRef, 0, 0, NativeMethods.PM_NOREMOVE);

            if (peeked)
            {

                // If the component wants us to process the message, do it.
                // The component manager hosts windows from many places.  We must be sensitive
                // to ansi / Unicode windows here.
                //
                if (msg.hwnd != IntPtr.Zero && SafeNativeMethods.IsWindowUnicode(new HandleRef(null, msg.hwnd)))
                {
                    unicodeWindow = true;
                    if (!UnsafeNativeMethods.GetMessageW(ref msg, NativeMethods.NullHandleRef, 0, 0))
                    {
                        continue;
                    }

                }
                else
                {
                    unicodeWindow = false;
                    if (!UnsafeNativeMethods.GetMessageA(ref msg, NativeMethods.NullHandleRef, 0, 0))
                    {
                        continue;
                    }
                }

                if (!PreTranslateMessage(ref msg))
                {
                    UnsafeNativeMethods.TranslateMessage(ref msg);
                    if (unicodeWindow)
                    {
                        UnsafeNativeMethods.DispatchMessageW(ref msg);
                    }
                    else
                    {
                        UnsafeNativeMethods.DispatchMessageA(ref msg);
                    }
                }

                if (form != null)
                {
                    continueLoop = !form.CheckCloseDialog(false);
                }
            }
            else if (form == null)
            {
                break;
            }
            else if (!UnsafeNativeMethods.PeekMessage(ref msg, NativeMethods.NullHandleRef, 0, 0, NativeMethods.PM_NOREMOVE))
            {
                UnsafeNativeMethods.WaitMessage();
            }
        }
        return continueLoop;
    }
    catch
    {
        return false;
    }
}
这里面核心的几个方法PeekMessage、TranslateMessage、GetMessage、DispatchMessage就是前面介绍的那些方法,这些方法都在UnsafeNativeMessage里,可以看到这里只是对这些非托管方法进行了包装。
使用Windows窗体进行进程间通讯
简单实现
要进行窗体间数据通讯,必须使用同步的SendMessage方法,为了这种特殊的进程间发送数据,Windows提供了一个名为: WM_COPYDATA的消息标识符。要进行通讯,必须找到目标窗体的句柄。这就要用到一些user32里面的方法了,所以这里先准备一些对user32里面函数调用进行P/Invoke包装。
public class WndHelper
{
    [StructLayout(LayoutKind.Sequential)]
    public struct COPYDATASTRUCT
    {
        public IntPtr dwData;
        public int cbData;
        public IntPtr lpData;
    }

    [StructLayout(LayoutKind.Sequential)]
    public readonly struct LPRECT
    {
        public readonly int Left;
        public readonly int Top;
        public readonly int Right;
        public readonly int Bottom;
    }

    [StructLayout(LayoutKind.Sequential, CharSet = CharSet.Unicode)]
    public struct WNDCLASS
    {
        public uint style;
        public WindowProc lpfnWndProc;
        public int cbClsExtra;
        public int cbWndExtra;
        public IntPtr hInstance;
        public IntPtr hIcon;
        public IntPtr hCursor;
        public IntPtr hbrBackground;
        [MarshalAs(UnmanagedType.LPWStr)]
        public string lpszMenuName;
        [MarshalAs(UnmanagedType.LPWStr)]
        public string lpszClassName;
    }

    public delegate IntPtr WindowProc(IntPtr hWnd, int msg, IntPtr wParam, IntPtr lParam);
    //消息标识
    public const int WM_COPYDATA = 0x004A;
    public const int WM_USER = 0x0400;
    public const int ERROR_CLASS_ALREADY_EXISTS = 1410;
    //枚举窗口时的委托参数
    public delegate bool WndEnumProc(IntPtr hWnd, int lParam);

    [DllImport("user32.dll", SetLastError = true)]
    public static extern ushort RegisterClassW([In] ref WNDCLASS lpWndClass);
    //枚举所有窗口
    [DllImport("user32.dll")]
    public static extern bool EnumWindows(WndEnumProc lpEnumFunc, int lParam);
    //获取窗口的父窗口句柄
    [DllImport("user32.dll")]
    private static extern IntPtr GetParent(IntPtr hWnd);
    [DllImport("user32.dll")]
    private static extern bool IsWindowVisible(IntPtr hWnd);
    [DllImport("user32.dll")]
    private static extern int GetWindowText(IntPtr hWnd, StringBuilder lptrString, int nMaxCount);
    [DllImport("user32.dll")]
    private static extern int GetClassName(IntPtr hWnd, StringBuilder lpString, int nMaxCount);
    [DllImport("user32.dll")]
    private static extern void SwitchToThisWindow(IntPtr hWnd, bool fAltTab);
    [DllImport("user32.dll")]
    private static extern bool GetWindowRect(IntPtr hWnd, ref LPRECT rect);
    [DllImport("user32.dll", SetLastError = true)]
    public static extern IntPtr CreateWindowExW(UInt32 dwExStyle, [MarshalAs(UnmanagedType.LPWStr)] string lpClassName, [MarshalAs(UnmanagedType.LPWStr)]
       string lpWindowName, UInt32 dwStyle, Int32 x, Int32 y, Int32 nWidth, Int32 nHeight, IntPtr hWndParent, IntPtr hMenu, IntPtr hInstance, IntPtr lpParam);

    [DllImport("user32.dll", SetLastError = true)]
    public static extern IntPtr DefWindowProcW(IntPtr hWnd, int msg, IntPtr wParam, IntPtr lParam);

    [DllImport("user32.dll")]
    public static extern int FindWindow(string lpClassName, string lpWindowName);

    [DllImport("user32.dll", SetLastError = true)]
    public static extern bool DestroyWindow(IntPtr hWnd);
    [DllImport("user32.dll")]
    public static extern bool PostMessage(IntPtr hWnd, int Msg, IntPtr wParam, IntPtr lParam);

    [DllImport("user32.dll")]
    public static extern int SendMessage(int hWnd, int Msg, int wParam, ref COPYDATASTRUCT lParam);
    //窗体列表
    private static List<WindowInfo> windowList;
    //Win32 窗口的一些基本信息
    public struct WindowInfo
    {
        public WindowInfo(IntPtr hWnd, string className, string title, bool isVisible, Rectangle bounds) : this()
        {
            Hwnd = hWnd;
            ClassName = className;
            Title = title;
            IsVisible = isVisible;
            Bounds = bounds;
        }
        //获取窗口句柄
        public IntPtr Hwnd { get; }
        //获取窗口类名
        public string ClassName { get; }
        //获取窗口标题
        public string Title { get; }
        //获取当前窗口是否可见
        public bool IsVisible { get; }
        //获取窗口当前的位置和尺寸
        public Rectangle Bounds { get; }
        // 获取窗口当前是否是最小化的。
        public bool IsMinimized => Bounds.Left == -32000 && Bounds.Top == -32000;
    }

    /// <summary>
    /// 查找当前用户空间下所有符合条件的(顶层)窗口。如果不指定条件,将仅查找可见且有标题栏的窗口。
    /// </summary>
    /// <param name="match">过滤窗口的条件。如果设置为 null,将仅查找可见和标题栏不为空的窗口。</param>
    /// <returns>找到的所有窗口信息</returns>
    public static IReadOnlyList<WindowInfo> FindAllWindows(Predicate<WindowInfo> match = null)
    {
        windowList = new List<WindowInfo>();    //遍历窗口并查找窗口相关WindowInfo信息
        EnumWindows(OnWindowEnum, 0);
        return windowList.FindAll(match ?? DefaultPredicate);
    }
    //遍历窗体处理的函数
    private static bool OnWindowEnum(IntPtr hWnd, int lparam)
    {
        // 仅查找顶层窗口。
        //if (GetParent(hWnd) == IntPtr.Zero)
        //{
        // 获取窗口类名。
        var lpString = new StringBuilder(512);
        GetClassName(hWnd, lpString, lpString.Capacity);
        var className = lpString.ToString();
        // 获取窗口标题。
        var lptrString = new StringBuilder(512);
        GetWindowText(hWnd, lptrString, lptrString.Capacity);
        var title = lptrString.ToString().Trim();
        // 获取窗口可见性。
        var isVisible = IsWindowVisible(hWnd);
        // 获取窗口位置和尺寸。
        LPRECT rect = default;
        GetWindowRect(hWnd, ref rect);
        var bounds = new Rectangle(rect.Left, rect.Top, rect.Right - rect.Left, rect.Bottom - rect.Top);
        // 添加到已找到的窗口列表。
        windowList.Add(new WindowInfo(hWnd, className, title, isVisible, bounds));
        if (title.Length > 0)
        {
            Console.WriteLine("title:" + title + " className:" + className);
        }
        //}
        return true;
    }
    // 默认的查找窗口的过滤条件。可见 + 非最小化 + 包含窗口标题。/// </summary>
    private static readonly Predicate<WindowInfo> DefaultPredicate = x => x.IsVisible && !x.IsMinimized && x.Title.Length > 0;
}
这里面主要包含了一些枚举所有窗体,以便后续查找目标窗体进行通讯使用,以及对发送消息的方法进行了包装。
接下来,就是创建消息通讯类了。最简单的方法就是新建一个Form窗体,重载它的 DefWndProc 方法,我这里新建一个Messager的窗体:
public partial class Messager : Form
{
    public Messager()
    {
        InitializeComponent();
        this.AutoScaleBaseSize = new System.Drawing.Size(6, 14);
        this.ClientSize = new System.Drawing.Size(200, 14);
        this.Name = "WinFormUsingPassingMsg";
        this.ShowInTaskbar = false;
        this.Text = "WinFormUsingPassingMsg";
        this.WindowState = System.Windows.Forms.FormWindowState.Minimized;
        this.Visible = false;
    }

    //接收到数据事件
    public EventHandler<MessageReceiveBytesEventArgs> OnReceiveBytes;

    protected override void DefWndProc(ref Message m)
    {
        switch (m.Msg)
        {
            case WndHelper.WM_COPYDATA:
                WndHelper.COPYDATASTRUCT cds = new WndHelper.COPYDATASTRUCT();
                Type mytype = cds.GetType();
                cds = (WndHelper.COPYDATASTRUCT)m.GetLParam(mytype);
                uint flag = (uint)(cds.dwData);
                byte[] bt = new byte[cds.cbData];
                Marshal.Copy(cds.lpData, bt, 0, bt.Length);
                if (OnReceiveBytes != null)
                {
                    MessageReceiveBytesEventArgs args = new MessageReceiveBytesEventArgs(flag, bt);
                    OnReceiveBytes(this, args);
                }
                break;
            default:
                base.DefWndProc(ref m);
                break;
        }
    }

    public bool SendBytes(string destWindow, uint flag, byte[] data)
    {
        int handle = WndHelper.FindWindow(null, destWindow);
        if (handle == 0) return false;
        return SendBytes(handle, flag, data);
    }
    public bool SendBytes(int destWindow, uint flag, byte[] data)
    {
        IntPtr ptrCopyData = IntPtr.Zero;
        bool result = false;
        try
        {
            if (destWindow == 0)
            {
                destWindow = this.Handle.ToInt32();
            }
            WndHelper.COPYDATASTRUCT cds;
            cds.dwData = (IntPtr)flag;
            cds.cbData = data.Length;
            ptrCopyData = Marshal.AllocHGlobal(data.Length);
            Marshal.Copy(data, 0, ptrCopyData, data.Length);
            cds.lpData = ptrCopyData;
            WndHelper.SendMessage(destWindow, WndHelper.WM_COPYDATA, 0, ref cds);
            result = true;
        }
        catch (Exception e)
        {

        }
        finally
        {
            if (ptrCopyData != IntPtr.Zero)
            {
                Marshal.FreeCoTaskMem(ptrCopyData);
            }
        }
        return result;
    }

}这里参考了从C#下使用WM_COPYDATA传输数据说到Marshal的应用 这篇文章。这里需要注意的是,我特意指定了这个窗体的Text为“WinFormUsingPassingMsg”,这个Text后面会变为窗体的Title。所以后面在遍历所有窗体的时候,可以根据Title=“WinFormUsingPassingMsg”,来找到要发送消息的窗体的Handle。
使用也挺简单,在需要用到的地方,直接实例化一个Messager窗体,然后将他的Visible设置为false,最后一点需要注意的是,一定要调用该窗体的Show()方法,这个方法似乎是在Windows上注册该窗体,否则在遍历窗体的时候,只new而不Show()是找不到这个窗体的。具体的一个demo如下,很简单,新建一个SendMsgText窗体:
public partial class SendMsgTest : Form
{
    private Messager msgWnd;
    public SendMsgTest()
    {
        InitializeComponent();
    }
    private void SendMsgTest_Load(object sender, EventArgs e)
    {
        msgWnd = new Messager();
        msgWnd.OnReceiveBytes += MsgWnd_OnReceiveBytes;
        //msgWnd.Left = -1000;
        //msgWnd.Top = -1000;
        msgWnd.Show();
        UpdateList();
    }

    private void MsgWnd_OnReceiveBytes(object sender, MessageReceiveBytesEventArgs args)
    {
        string str = Encoding.UTF8.GetString(args.Bytes);
        this.txtReceiveText.Text += (str + Environment.NewLine);
    }

    private void btnLaunch_Click(object sender, EventArgs e)
    {
        // run ourself
        Process.Start(Assembly.GetEntryAssembly().GetModules()[0].FullyQualifiedName);
        Task.Factory.StartNew(() =>
        {
            Thread.Sleep(1000);

        }).ContinueWith(x => { UpdateList(); }, TaskScheduler.FromCurrentSynchronizationContext());
        //UpdateList();
    }

    void UpdateList()
    {
        ProcessListBox.Items.Clear();
        List<WndHelper.WindowInfo> list = WndHelper.FindAllWindows(x => x.Title == "WinFormUsingPassingMsg").ToList();
        foreach (var hWnd in list)
            if (msgWnd.Handle != hWnd.Hwnd)
                ProcessListBox.Items.Add(hWnd.Hwnd.ToInt64().ToString());
    }
    private void btnSendBytes_Click(object sender, EventArgs e)
    {
        if (string.IsNullOrEmpty(txtSendText.Text))
        {
            MessageBox.Show("请输入发送内容");
            return;
        }
        byte[] msg = Encoding.UTF8.GetBytes(txtSendText.Text);
        if (ProcessListBox.SelectedItem == null)
        {
            msgWnd.SendBytes(msgWnd.Handle.ToInt32(), (uint)SendFlag.SendBytes, msg);
        }
        else
        {
            msgWnd.SendBytes(int.Parse(ProcessListBox.SelectedItem as string), (uint)SendFlag.SendBytes, msg);
        }
        this.txtSendText.Text = string.Empty;
    }
}
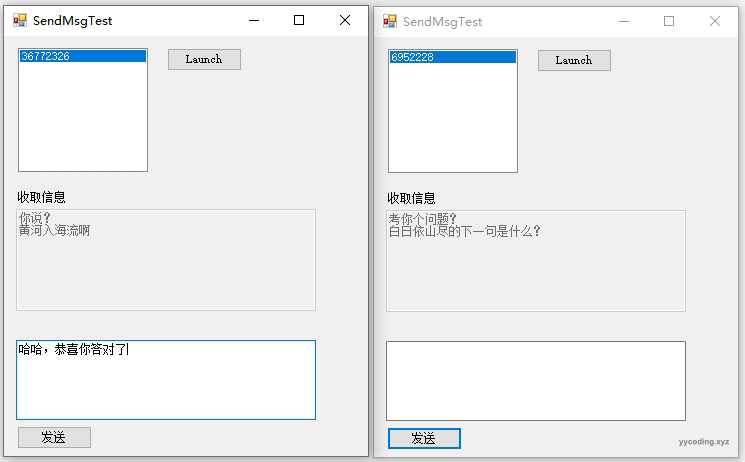
窗体上有一个Launch按钮,可以开启另外一个程序的实例,然后会将其它实例中,包含了Message窗体的句柄ID找出来,列到ListBox中,选择某个句柄,就可以与包含该句柄的窗体进行消息通讯了。

是不是非常简单,上述方法很简单,但仍然有改进的余地。
比如上面这个Messager窗体是一个System.Windows.Forms窗体,它本质上是对非托管Win32窗体的包装。在托管窗体上是没有办法设置ClassName的,它的ClassName是编译器自动生成的,我们无法自己定义,唯一可能的就是只能通过Text即Title来进行过滤目标窗体句柄,这个Title可能会跟其它应用的Title重合。
Title:WinFormUsingPassingMsg
ClassName:WindowsForms10.Window.8.app.0.141b42a_r9_ad1
另外使用的时候,必须调用它的Show()方法。
改进
因为System.Windows.Forms本质上是对Win32窗体的一种包装,所以我们可以使用user32里面的一些函数来自动创建并注册一个win32窗体。这里参考了registering-a-custom-win32-window-class-from-c-sharp以及Understanding Windows Message Queues for the C# Developer并做了简单修改。
方法就是新建一个MessageWindow类,然后在构造函数中,调用Win32中创建窗体和注册回调的方法。这里需要注意的是该类并没有设置消息循环,因为使用该类的Windows窗体已经具备消息循环的功能。
类以及相关方法如下,该类除了演示了Send发送WM_COPYDATA 类型消息之外,还演示了Post发送 WM_USER类型的消息。
class MessageWindow : IDisposable
{
    bool _disposed;
    IntPtr _handle;
    WndHelper.WindowProc _wndProc;
    //接收到数据委托与事件定义
    public EventHandler<MessageReceiveBytesEventArgs> OnMessageReceiveBytes;
    public EventHandler<MessageReceivedEventArgs> OnMessageReceived;
    ~MessageWindow()
    {
        Dispose();
    }
    public void Dispose()
    {
        Dispose(true);
        GC.SuppressFinalize(this);
    }
    void Dispose(bool disposing)
    {
        if (!_disposed)
        {
            // Dispose unmanaged resources
            if (_handle != IntPtr.Zero)
            {
                WndHelper.DestroyWindow(_handle);
                _handle = IntPtr.Zero;
            }
            _disposed = true;
        }
    }

    public MessageWindow(string className)
    {
        if (string.IsNullOrEmpty(className))
            className = "MessageWindow";
        _wndProc = WndProc;

        // Create WNDCLASS
        var wndclass = new WNDCLASS();
        wndclass.lpszClassName = className;
        wndclass.lpfnWndProc = _wndProc;

        var classAtom = RegisterClassW(ref wndclass);
        int lastError = Marshal.GetLastWin32Error();
        if (classAtom == 0 && lastError != ERROR_CLASS_ALREADY_EXISTS)
        {
            throw new Exception("Could not register window class");
        }

        // Create window
        _handle = CreateWindowExW(
            0,
            wndclass.lpszClassName,
            String.Empty,
            0,
            0,
            0,
            0,
            0,
            IntPtr.Zero,
            IntPtr.Zero,
            IntPtr.Zero,
            IntPtr.Zero
        );
    }


    private IntPtr WndProc(IntPtr hWnd, int msg, IntPtr wParam, IntPtr lParam)
    {
        if (msg >= WM_USER && msg < WM_USER + 0x8000)
        {
            var args = new MessageReceivedEventArgs(msg - WM_USER, wParam, lParam);
            OnMessageReceived?.Invoke(this, args);
            if (!args.Handled)
                return WndHelper.DefWindowProcW(hWnd, msg, wParam, lParam);
            return IntPtr.Zero;
        }
        else if (msg == WM_COPYDATA)
        {
            COPYDATASTRUCT copyData = (COPYDATASTRUCT)Marshal.PtrToStructure(lParam, typeof(COPYDATASTRUCT));
            uint flag = (uint)(copyData.dwData);
            byte[] bt = new byte[copyData.cbData];
            Marshal.Copy(copyData.lpData, bt, 0, bt.Length);
            if (OnMessageReceiveBytes != null)
            {
                MessageReceiveBytesEventArgs args = new MessageReceiveBytesEventArgs(flag, bt);
                OnMessageReceiveBytes(this, args);
            }
            return IntPtr.Zero;
        }
        return DefWindowProcW(hWnd, msg, wParam, lParam);
    }
    public void PostMessage(int messageId, IntPtr wParam, IntPtr lParam)
    {
        WndHelper.PostMessage(_handle, messageId + WM_USER, wParam, lParam);
    }
    public bool SendBytes(int destWindow, uint flag, byte[] data)
    {
        IntPtr ptrCopyData = IntPtr.Zero;
        bool result = false;
        try
        {
            if (destWindow == 0)
            {
                destWindow = _handle.ToInt32();
            }
            COPYDATASTRUCT cds;
            cds.dwData = (IntPtr)flag;
            cds.cbData = data.Length;
            ptrCopyData = Marshal.AllocHGlobal(data.Length);
            Marshal.Copy(data, 0, ptrCopyData, data.Length);
            cds.lpData = ptrCopyData;
            SendMessage(destWindow, WM_COPYDATA, 0, ref cds);
            result = true;
        }
        catch (Exception e)
        {

        }
        finally
        {
            if (ptrCopyData != IntPtr.Zero)
            {
                Marshal.FreeCoTaskMem(ptrCopyData);
            }
        }
        return result;
    }

    public static void PostRemoteMessage(IntPtr hWnd, int messageId, IntPtr parameter1, IntPtr parameter2)
    {
        WndHelper.PostMessage(hWnd, messageId + WM_USER, parameter1, parameter2);
    }

    public static IReadOnlyList<IntPtr> GetMessageWindowHandlesByClassName(string className)
    {
        if (string.IsNullOrEmpty(className))
            className = "MessageWindow";
        var result = new List<IntPtr>();
        var sb = new StringBuilder(256);
        IReadOnlyList<WindowInfo> wnds = WndHelper.FindAllWindows(x => x.ClassName == className);
        foreach (var item in wnds)
        {
            result.Add(item.Hwnd);
        }
        Thread.Sleep(100);
        return result;
    }
    public IntPtr Handle { get { return _handle; } }
}

public class MessageReceivedEventArgs : EventArgs
{
    public MessageReceivedEventArgs(int messageId, IntPtr parameter1, IntPtr parameter2)
    {
        MessageId = messageId;
        Parameter1 = parameter1;
        Parameter2 = parameter2;
    }
    public int MessageId { get; }
    public IntPtr Parameter1 { get; }
    public IntPtr Parameter2 { get; }
    public bool Handled { get; set; }
}

public class MessageReceiveBytesEventArgs : EventArgs
{
    private uint flag;
    private byte[] bytes;
    public MessageReceiveBytesEventArgs(uint f, byte[] bytes)
    {
        this.flag = f;
        this.bytes = bytes;
    }

    public uint Flag { get { return flag; } }
    public byte[] Bytes { get { return bytes; } }

}

enum SendFlag : uint
{
    SendMsg = 1,
    SendBytes = 2
}以上的核心就是构造函数里面的注册Win窗体代码以及事件处理方法WndProc,注意这里可以自己定义窗体的ClassName,如果不传默认就是用“MessageWindow”。另外如果要将C#结构体转为非托管的指针,需要使用Marshal.StructureToPtr 反之,需要使用Marshal.PtrToStructure。
改进后使用起来就更简单了,要用的地方只需要实例化一个MessageWindow类,并注册相关的事件即可。
MessageWindow _msgWnd;
public Main()
{
    InitializeComponent();
    _msgWnd = new MessageWindow("MainMessageWindow");
    _msgWnd.OnMessageReceived += _msgWnd_MessageReceived;
    _msgWnd.OnMessageReceiveBytes += _msgWnd_OnReceiveBytes;
}
再获取目标消息窗体的时候,此时采用的是使用ClassName的方式来查找,因为使用的是非托管函数,能够允许我们自定义窗体的ClassName;而且在实例化窗体的时候,直接调用了RegisterClassW方法来注册窗体,免去了之前必须手动调用Show方法的麻烦。
获取所有目标窗体的方法如下:
void UpdateList()
{
    ProcessListBox.Items.Clear();
    foreach (var hWnd in MessageWindow.GetMessageWindowHandlesByClassName("MainMessageWindow"))
        if (_msgWnd.Handle != hWnd)
            ProcessListBox.Items.Add(hWnd.ToInt64().ToString());
}

public static IReadOnlyList<IntPtr> GetMessageWindowHandlesByClassName(string className)
{
    if (string.IsNullOrEmpty(className))
        className = "MessageWindow";
    var result = new List<IntPtr>();
    var sb = new StringBuilder(256);
    IReadOnlyList<WindowInfo> wnds = WndHelper.FindAllWindows(x => x.ClassName == className);
    foreach (var item in wnds)
    {
        result.Add(item.Hwnd);
    }
    Thread.Sleep(100);
    return result;
}
其它的方法与前面类似。
总结
窗体和消息系统是两个紧密联系的概念,本文介绍了Window的消息系统以及消息循环。在此基础上演示了如何使用Window窗体来进行消息通讯。
参考
Understanding Windows Message Queues for the C# Developer - CodeProject
Windows Form Message Loop - C# / C Sharp (bytes.com)
Application.Run Method (System.Windows.Forms) | Microsoft Learn
https://blog.csdn.net/Gefangenes/article/details/132142990
Application.cs (microsoft.com)
Message loop in Microsoft Windows - Wikipedia
Understanding SynchronizationContext: Part II - CodeProject
Understanding SynchronizationContext (Part I) - CodeProject
About Messages and Message Queues - Win32 apps | Microsoft Learn
Window Procedures - Win32 apps | Microsoft Learn
https://blog.csdn.net/qq_37192571/article/details/121897568
https://blog.csdn.net/u011555996/article/details/112589219
https://www.cnblogs.com/jiangyh-is-me/archive/2006/06/05/417381.html