Mongo(也译芒果)名字来自humongous,意思是巨大无比的,极大的。它是一个高性能,开源,无模式的文档型NOSQL数据库。今天参照着官方的QuickStart配置了一下环境。
第一步:下载Mongodb编译好了的版本,本人机器为Win7 32位的专业版本,下载对应的Windows 32-bit版本。
第二步:将下载的Zip文件解压,修改文件夹名称,名称遵循一般的文件命名规则即可,我将其修改为 mongodb,解压后的文件放在C:\mongodb中,然后建立一个存放mongodb数据的文件夹,本人建立的文件夹为c:\data\db。
第三步:以管理员身份运行 cmd,将当前目录cd到c:\mongodb\bin 下面,然后运行
c:\mongodb\bin>mongod.exe --dbpath c:\data\db,设置数据库存放路径为我们前面建立的文件夹。成功后会出现下面的界面: 图中Note:提示,在32为系统中使用MongoDB,数据库大小限制为2G.
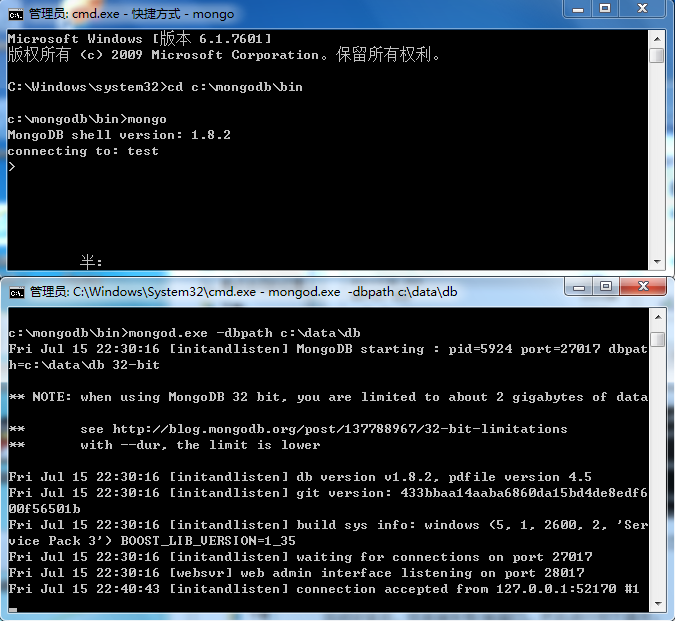
第四步:上面的这个CMD窗口不要关,否则 Mongdb服务就会关闭。
第五步:再次以管理员身份打开一个CMD窗口。在里面输入
c:\mongodb\bin>mongo 如果出现图,说明默认的test数据库连接成功。同时,在后台的cmd中也可以看到前台连接信息。
环境搭建好了之后,我们就可以开始试验了。
在cmd中输入以下命令:
C:\> cd \mongodb\bin
C:\mongodb\bin> mongo
> // the mongo shell is a javascript shell connected to the db
> // by default it connects to database 'test' at localhost
> 3+3
6
> db
test
> // the first write will create the db:
> db.foo.insert( { a : 1 } )
> db.foo.find()
{ "_id" : ObjectId("4e2053a6b3fcd89b00572c2f"), "a" : 1 }
> show dbs
>admin   (empty)
  local   (empty)
  test    0.03125GB
其中,db显示当前正在使用的数据库。db.foo.insert({a:1}),表示向当前db,test下建立一个集合foo,并向其中添加一条记录。
输入下列指令:
> use mydb
switched to db mydb
> j={name:"mongo"};
{ "name" : "mongo" }
> t={x:3};
{ "x" : 3 }
> db.things.save{j};
Fri Jul 15 22:56:57 SyntaxError: missing ; before statement (shell):1
> db.things.save(j);
> db.things.save(t);
> db.things.find();
{ "_id" : ObjectId("4e205546b3fcd89b00572c31"), "name" : "mongo" }
{ "_id" : ObjectId("4e20554fb3fcd89b00572c32"), "x" : 3 }
use mydb表示切换到mydb这个数据库中,在mongodb中数据库或者集合可以不事先创建,待数据插入操作执行时才创建。
上面的语句在mydb下的things这个Collection中插入了两条记录,现在我们利用循环插入更多条记录。
> for(var i=1;i<=20;i++) db.things.save({x:4,j:i});
> db.things.find()
{ "_id" : ObjectId("4e205546b3fcd89b00572c31"), "name" : "mongo" }
{ "_id" : ObjectId("4e20554fb3fcd89b00572c32"), "x" : 3 }
{ "_id" : ObjectId("4e205693b3fcd89b00572c33"), "x" : 4, "j" : 1 }
{ "_id" : ObjectId("4e205693b3fcd89b00572c34"), "x" : 4, "j" : 2 }
{ "_id" : ObjectId("4e205693b3fcd89b00572c35"), "x" : 4, "j" : 3 }
{ "_id" : ObjectId("4e205693b3fcd89b00572c36"), "x" : 4, "j" : 4 }
{ "_id" : ObjectId("4e205693b3fcd89b00572c37"), "x" : 4, "j" : 5 }
{ "_id" : ObjectId("4e205693b3fcd89b00572c38"), "x" : 4, "j" : 6 }
{ "_id" : ObjectId("4e205693b3fcd89b00572c39"), "x" : 4, "j" : 7 }
{ "_id" : ObjectId("4e205693b3fcd89b00572c3a"), "x" : 4, "j" : 8 }
{ "_id" : ObjectId("4e205693b3fcd89b00572c3b"), "x" : 4, "j" : 9 }
{ "_id" : ObjectId("4e205693b3fcd89b00572c3c"), "x" : 4, "j" : 10 }
{ "_id" : ObjectId("4e205693b3fcd89b00572c3d"), "x" : 4, "j" : 11 }
{ "_id" : ObjectId("4e205693b3fcd89b00572c3e"), "x" : 4, "j" : 12 }
{ "_id" : ObjectId("4e205693b3fcd89b00572c3f"), "x" : 4, "j" : 13 }
{ "_id" : ObjectId("4e205693b3fcd89b00572c40"), "x" : 4, "j" : 14 }
{ "_id" : ObjectId("4e205693b3fcd89b00572c41"), "x" : 4, "j" : 15 }
{ "_id" : ObjectId("4e205693b3fcd89b00572c42"), "x" : 4, "j" : 16 }
{ "_id" : ObjectId("4e205693b3fcd89b00572c43"), "x" : 4, "j" : 17 }
{ "_id" : ObjectId("4e205693b3fcd89b00572c44"), "x" : 4, "j" : 18 }
has more
> it
{ "_id" : ObjectId("4e205693b3fcd89b00572c45"), "x" : 4, "j" : 19 }
{ "_id" : ObjectId("4e205693b3fcd89b00572c46"), "x" : 4, "j" : 20 }
我们通过循环语句插入了20条记录,但是显示的的只有18条,如果要显示剩余的,在命令行中敲入it就可以显示余下的。
本文简单介绍了Mongodb环境的搭建以及基本命令的使用。