本篇文章严重参考阿迪王的 Windows 10 IoT: How to Drive an SSD1306 I2C Display 这篇文章,我的传感器都是参照该博客来购买的。在进行以下实验时,最好保证树莓派安装的是官方系统。我之前安装的是64位Ubuntu 20系统,但是在需要访问I2C接口,或者访问树莓派官方摄像头,红外传感器发送和接受,以及本文的SSD1306显示时,总会遇到各种各样的问题。所以我重新将系统换成了官方32位系统以及32位.NET Core运行时,这对于Visual Studio开发来说没有变化,依旧发布后,拷贝到树莓派上即可运行,不需要关注32位或者64位。
SSD1306 I2C OLED显示器
SSD1306 I2C OLED显示器分辨率为128×64,也叫12864屏,SSD1306为其显示驱动芯片,长这样,各位在购买传感器的时候一定要注意针脚的个数:
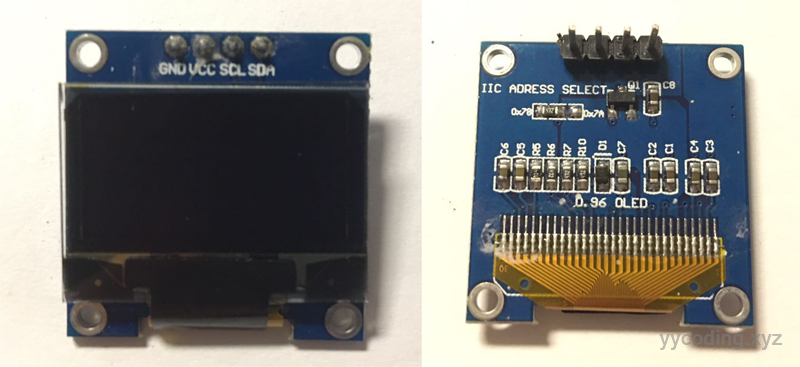
▲四阵脚SSD1306 I2C OLED显示屏
因为是使用I2C接口进行通信,所以尤其要注意接线位置,可以参考树莓派针脚图:
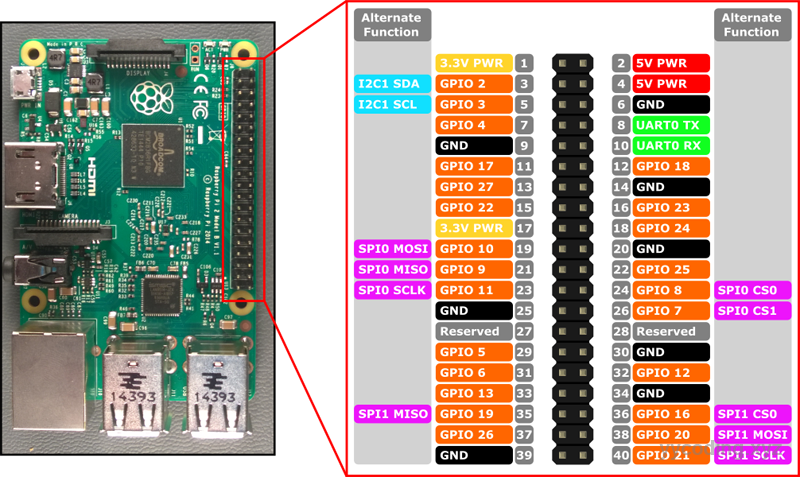
▲树莓派针脚图,尤其要注意特定的I2C针脚
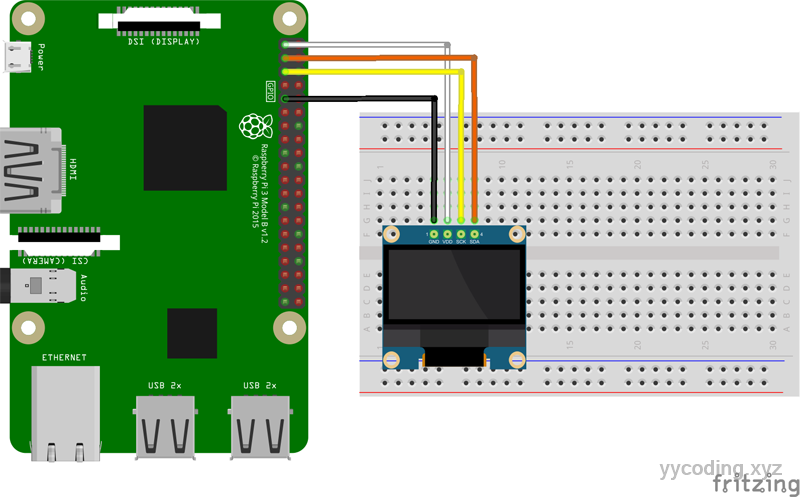
布线如上图,GND连GND, VCC连5V,SCL连GPIO3,SDA连GPIO2。这里的连线要跟代码里的一致。
写代码
和参考博文里一样,采用了https://github.com/stefangordon/IoTCore-SSD1306-Driver 这个代码,直接下载,因为这个是针对Windows 10 IoT的,我这里简单做了修改,里面主要有四个文件Display.cs, DisplayFontClass.cs,DisplayImage.cs 和 DisplayManager.cs。这里的主要类是Display.cs,其他几个都是显示字体,图形等等。Display.cs的内容如下。要特别注意的是,接线要按照图上的来接,或者修改下面的代码。如果不喜欢看,可以直接下载上文连接里面的代码,然后在初始化I2cDevice的时候简单修改一下即可。
 class Display
    {
        /* This driver is intended to be used with SSD1306 based OLED displays connected via I2c
         * Such as http://amzn.to/1Urepy1, http://amzn.to/1VG54aU and http://www.adafruit.com/product/938
         * It will require four wires to the display.  Power (VCC), Ground, SCL and SDA (I2C)
         *
         * For a Raspberry Pi this is:
         * VCC -> Pi Pin 1 (3.3v)
         * Ground -> Pi Pin 6
         * SDA -> Pi Pin 3
         * SCL -> Pi Pin 5
         *
         * For DIYMall branded OLEDs the I2C address is 0x3C.  It may vary by manufacturer and can be changed down below.
         */

        private const UInt32 SCREEN_WIDTH_PX = 128;                         /* Number of horizontal pixels on the display */
        private const UInt32 SCREEN_HEIGHT_PX = 64;                         /* Number of vertical pixels on the display   */
        private const UInt32 SCREEN_HEIGHT_PAGES = SCREEN_HEIGHT_PX / 8;    /* The vertical pixels on this display are arranged into 'pages' of 8 pixels each */
        private byte[,] DisplayBuffer =
            new byte[SCREEN_WIDTH_PX, SCREEN_HEIGHT_PAGES];                 /* A local buffer we use to store graphics data for the screen                    */
        private byte[] SerializedDisplayBuffer =
            new byte[SCREEN_WIDTH_PX * SCREEN_HEIGHT_PAGES];                /* A temporary buffer used to prepare graphics data for sending over i2c          */

        /* Definitions for I2C */
        const string I2CControllerName = "I2C1";
        private I2cDevice displayI2c;
        const byte SSD1306_Address = 0x3C;//0x3C

        /* Display commands. See the datasheet for details on commands: http://www.adafruit.com/datasheets/SSD1306.pdf                      */
        private static readonly byte[] CMD_DISPLAY_OFF = { 0xAE };              /* Turns the display off                                    */
        private static readonly byte[] CMD_DISPLAY_ON = { 0xAF };               /* Turns the display on                                     */
        private static readonly byte[] CMD_CHARGEPUMP_ON = { 0x8D, 0x14 };      /* Turn on internal charge pump to supply power to display  */
        private static readonly byte[] CMD_MEMADDRMODE = { 0x20, 0x00 };        /* Horizontal memory mode                                   */
        private static readonly byte[] CMD_SEGREMAP = { 0xA1 };                 /* Remaps the segments, which has the effect of mirroring the display horizontally */
        private static readonly byte[] CMD_COMSCANDIR = { 0xC8 };               /* Set the COM scan direction to inverse, which flips the screen vertically        */
        private static readonly byte[] CMD_RESETCOLADDR = { 0x21, 0x00, 0x7F }; /* Reset the column address pointer                         */
        private static readonly byte[] CMD_RESETPAGEADDR = { 0x22, 0x00, 0x07 };/* Reset the page address pointer                           */


        /* Initialize GPIO, I2C, and the display
           The device may not respond to multiple Init calls without being power cycled
           so we allow an optional boolean to excuse failures which is useful while debugging
           without power cycling the display */
        public async void Init(bool proceedOnFail = false)
        {
            Debug.WriteLine("SSD1306::Initialize");

            try
            {
                //Instantiate the I2CConnectionSettings using the device address
                I2cConnectionSettings settings = new I2cConnectionSettings(1, SSD1306_Address);
                displayI2c = I2cDevice.Create(settings);

                //Check if device was found
                if (displayI2c == null)
                {
                    Debug.WriteLine("Device not found");
                }
                else
                {
                    InitDisplay(proceedOnFail);
                }
            }
            catch (Exception e)
            {
                Debug.WriteLine("Exception: " + e.Message + "\n" + e.StackTrace);
                throw;
            }
        }

        /* Send I2C commands to power up and initialize the display */
        private void InitDisplay(bool proceedOnFail)
        {
            /* Initialize the display */
            try
            {
                DisplaySendCommand(CMD_CHARGEPUMP_ON);  /* Turn on the internal charge pump to provide power to the screen          */
                DisplaySendCommand(CMD_MEMADDRMODE);    /* Set the addressing mode to "horizontal"                                  */
                DisplaySendCommand(CMD_SEGREMAP);       /* Flip the display horizontally, so it's easier to read on the breadboard  */
                DisplaySendCommand(CMD_COMSCANDIR);     /* Flip the display vertically, so it's easier to read on the breadboard    */
                DisplaySendCommand(CMD_DISPLAY_ON);     /* Turn the display on                                                      */
            }
            catch (Exception ex)
            {
                if (!proceedOnFail)
                {
                    throw new Exception("Display Initialization Failed", ex);
                }
            }
        }

        /* Send graphics data to the screen */
        private void DisplaySendData(byte[] Data)
        {
            byte[] commandBuffer = new byte[Data.Length + 1];
            Data.CopyTo(commandBuffer, 1);
            commandBuffer[0] = 0x40; // display buffer register

            displayI2c.Write(commandBuffer);
        }

        /* Send commands to the screen */
        private void DisplaySendCommand(byte[] Command)
        {
            byte[] commandBuffer = new byte[Command.Length + 1];
            Command.CopyTo(commandBuffer, 1);
            commandBuffer[0] = 0x00; // control register

            displayI2c.Write(commandBuffer);
        }

        /* Writes the Display Buffer out to the physical screen for display */
        public void DisplayUpdate()
        {
            int Index = 0;
            /* We convert our 2-dimensional array into a serialized string of bytes that will be sent out to the display */
            for (int PageY = 0; PageY < SCREEN_HEIGHT_PAGES; PageY++)
            {
                for (int PixelX = 0; PixelX < SCREEN_WIDTH_PX; PixelX++)
                {
                    SerializedDisplayBuffer[Index] = DisplayBuffer[PixelX, PageY];
                    Index++;
                }
            }

            /* Write the data out to the screen */
            DisplaySendCommand(CMD_RESETCOLADDR);         /* Reset the column address pointer back to 0 */
            DisplaySendCommand(CMD_RESETPAGEADDR);        /* Reset the page address pointer back to 0   */
            DisplaySendData(SerializedDisplayBuffer);     /* Send the data over i2c                     */
        }

        /*
         * NAME:        WriteLineDisplayBuf
         * DESCRIPTION: Writes a string to the display screen buffer (DisplayUpdate() needs to be called subsequently to output the buffer to the screen)
         * INPUTS:
         *
         * Line:      The string we want to render. In this sample, special characters like tabs and newlines are not supported.
         * Col:       The horizontal column we want to start drawing at. This is equivalent to the 'X' axis pixel position.
         * Row:       The vertical row we want to write to. The screen is divided up into 4 rows of 16 pixels each, so valid values for Row are 0,1,2,3.
         *
         * RETURN VALUE:
         * None. We simply return when we encounter characters that are out-of-bounds or aren't available in the font.
         */
        public void WriteLineDisplayBuf(String Line, UInt32 Col, UInt32 Row)
        {
            UInt32 CharWidth = 0;
            foreach (Char Character in Line)
            {
                CharWidth = WriteCharDisplayBuf(Character, Col, Row);
                Col += CharWidth;   /* Increment the column so we can track where to write the next character   */
                if (CharWidth == 0) /* Quit if we encounter a character that couldn't be printed                */
                {
                    return;
                }
            }
        }

        /*
         * NAME:        WriteCharDisplayBuf
         * DESCRIPTION: Writes one character to the display screen buffer (DisplayUpdate() needs to be called subsequently to output the buffer to the screen)
         * INPUTS:
         *
         * Character: The character we want to draw. In this sample, special characters like tabs and newlines are not supported.
         * Col:       The horizontal column we want to start drawing at. This is equivalent to the 'X' axis pixel position.
         * Row:       The vertical row we want to write to. The screen is divided up into 4 rows of 16 pixels each, so valid values for Row are 0,1,2,3.
         *
         * RETURN VALUE:
         * We return the number of horizontal pixels used. This value is 0 if Row/Col are out-of-bounds, or if the character isn't available in the font.
         */
        public UInt32 WriteCharDisplayBuf(Char Chr, UInt32 Col, UInt32 Row)
        {
            /* Check that we were able to find the font corresponding to our character */
            FontCharacterDescriptor CharDescriptor = DisplayFontTable.GetCharacterDescriptor(Chr);
            if (CharDescriptor == null)
            {
                return 0;
            }

            /* Make sure we're drawing within the boundaries of the screen buffer */
            UInt32 MaxRowValue = (SCREEN_HEIGHT_PAGES / DisplayFontTable.FontHeightBytes) - 1;
            UInt32 MaxColValue = SCREEN_WIDTH_PX;
            if (Row > MaxRowValue)
            {
                return 0;
            }
            if ((Col + CharDescriptor.CharacterWidthPx + DisplayFontTable.FontCharSpacing) > MaxColValue)
            {
                return 0;
            }

            UInt32 CharDataIndex = 0;
            UInt32 StartPage = Row * 2;                                              //0
            UInt32 EndPage = StartPage + CharDescriptor.CharacterHeightBytes;        //2
            UInt32 StartCol = Col;
            UInt32 EndCol = StartCol + CharDescriptor.CharacterWidthPx;
            UInt32 CurrentPage = 0;
            UInt32 CurrentCol = 0;

            /* Copy the character image into the display buffer */
            for (CurrentPage = StartPage; CurrentPage < EndPage; CurrentPage++)
            {
                for (CurrentCol = StartCol; CurrentCol < EndCol; CurrentCol++)
                {
                    DisplayBuffer[CurrentCol, CurrentPage] = CharDescriptor.CharacterData[CharDataIndex];
                    CharDataIndex++;
                }
            }

            /* Pad blank spaces to the right of the character so there exists space between adjacent characters */
            for (CurrentPage = StartPage; CurrentPage < EndPage; CurrentPage++)
            {
                for (; CurrentCol < EndCol + DisplayFontTable.FontCharSpacing; CurrentCol++)
                {
                    DisplayBuffer[CurrentCol, CurrentPage] = 0x00;
                }
            }

            /* Return the number of horizontal pixels used by the character */
            return CurrentCol - StartCol;
        }

        public UInt32 WriteImageDisplayBuf(DisplayImage img, UInt32 Col, UInt32 Row)
        {
            /* Make sure we're drawing within the boundaries of the screen buffer */
            UInt32 MaxRowValue = (SCREEN_HEIGHT_PAGES / img.ImageHeightBytes) - 1;
            UInt32 MaxColValue = SCREEN_WIDTH_PX;
            if (Row > MaxRowValue)
            {
                return 0;
            }

            if ((Col + img.ImageWidthPx + DisplayFontTable.FontCharSpacing) > MaxColValue)
            {
                return 0;
            }

            UInt32 CharDataIndex = 0;
            UInt32 StartPage = Row * 2;                                              //0
            UInt32 EndPage = StartPage + img.ImageHeightBytes;        //2
            UInt32 StartCol = Col;
            UInt32 EndCol = StartCol + img.ImageWidthPx;
            UInt32 CurrentPage = 0;
            UInt32 CurrentCol = 0;

            /* Copy the character image into the display buffer */
            for (CurrentCol = StartCol; CurrentCol < EndCol; CurrentCol++)
            {
                for (CurrentPage = StartPage; CurrentPage < EndPage; CurrentPage++)
                {
                    DisplayBuffer[CurrentCol, CurrentPage] = img.ImageData[CharDataIndex];
                    CharDataIndex++;
                }
            }

            /* Return the number of horizontal pixels used by the character */
            return CurrentCol - StartCol;
        }

        /* Sets all pixels in the screen buffer to 0 */
        public void ClearDisplayBuf()
        {
            Array.Clear(DisplayBuffer, 0, DisplayBuffer.Length);
        }
    }
其他各类,不需要做任何修改,所以我这里不贴出来了。
使用方法在DisplayManger.cs类里。
    static class DisplayManager
    {
        private static Display display;

        public static void Init()
        {
            display = new SSD1306.Display();
            display.Init(true);
            Update();
        }

        static void Update()
        {
            display.ClearDisplayBuf();

            DrawBody();

            display.DisplayUpdate();
        }

        static void DrawBody()
        {
            // Row 0, and image
            display.WriteImageDisplayBuf(DisplayImages.ClockDown, 0, 0);

            // Row 1 - 3
            display.WriteLineDisplayBuf("Hello", 0, 1);
            display.WriteLineDisplayBuf("World", 0, 2);
            string datetime = DateTime.Now.ToString("yyyy-MM-dd HH:mm:ss");
            display.WriteLineDisplayBuf(datetime, 0, 3);
        }

    }
在DrawBody方法里,一共有四行,第一行画了一个时钟屏幕,第二行至第四行画了文字,直接在Main主函数里调用 DisplayManager.Init()方法就能显示。
显示效果
发布,拷贝,运行,效果如下:

参考
特别鸣谢以下链接,前人吃螃蟹,后人才能不用996🤣。