在开发应用程序的时候,会有不同的解决方案配置,最常见的有Debug环境和Release环境,有时候这两个环境的配置文件里的配置项是不一样的,比如在Debug环境下,数据库连接字符串可能需要设置为测试环境或者本地的DB,而Release环境则需要连接生产环境。当配置项很多时,对于这种不同环境下的不同配置,手动修改配置文件的做法非常繁琐且容易出错。
<appSettings>
	<!--正式-->
	<!--<add key="DbConnection" value="Data Source=10.176.1.2;Initial Catalog=vipsoft;User ID=sa;Password=....;" />-->
	<!--测试-->
	<!--<add key="DbConnection" value="Data Source=172.16.0.1;Initial Catalog=vipsoft;User ID=sa;Password=123456;" />-->
	<!--开发-->
	<add key="DbConnection" value="Data Source=172.16.0.2;Initial Catalog=vipsoft;User ID=sa;Password=666666;" />
</appSettings>
除了这些简单的环境,在实际项目中,可能还有更多的环境,比如:
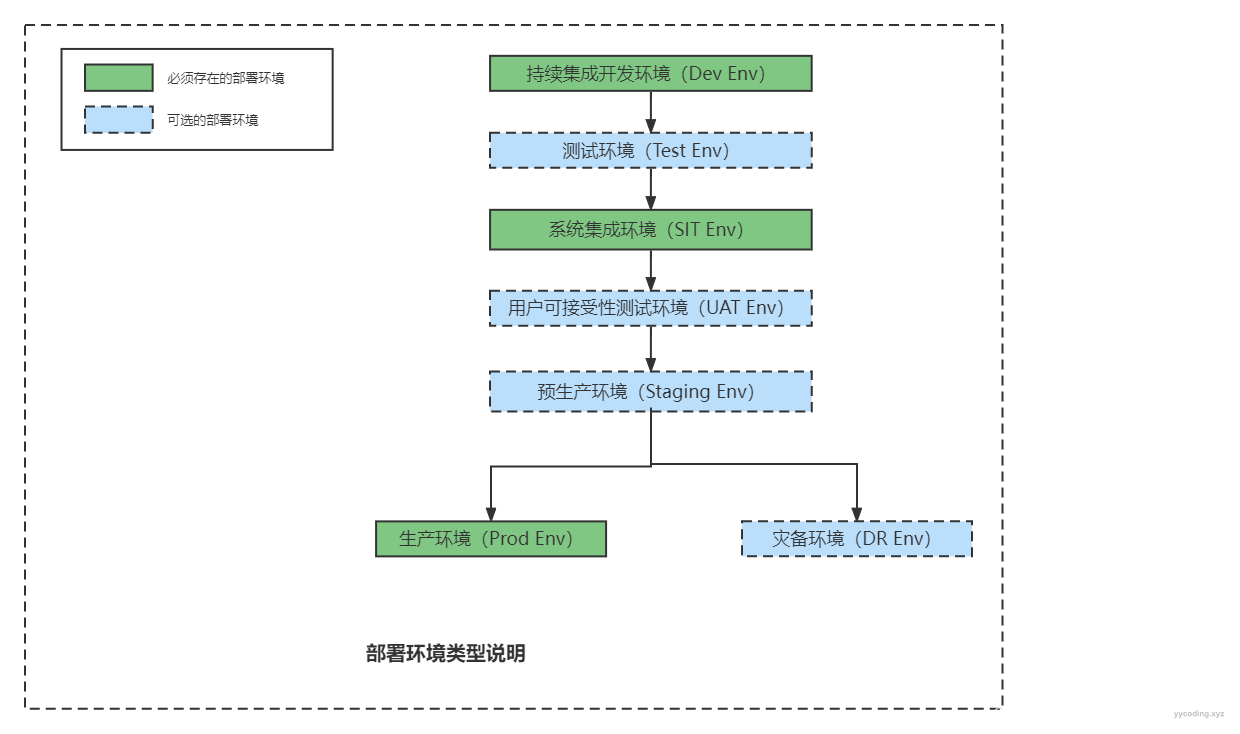
- DEV环境:Development environment,开发环境、开发人员使用,版本变动很大。
- TEST环境:测试环境,专门给测试人员使用的,版本相对稳定。
- UAT环境: User Acceptance environment,用户验收测试环境。此环境主要用来进行软件产品的验收,用户(客户方)会直接参与,用户根据需求功能文档进行验收,当然在用户验收前可以可以跑API自动化测试和UI自动化测试。此外根据客户项目合同要求,可能需要出具可接受性测试报告:包括但不限于,功能性测试报告,安全测试报告,性能测试报告等。
- STAGING环境:预发布环境,一般在直接上生产环境之前,会进行一些基本健康测试,有的时候还会进行模拟生产环境的真实数据进行试运行,很多时候都是在正常生产环境的配置和网络条件下进行的,试运行之后,没有问题了,就会把预生产环境切换回来,或者直接上生产环境。从预生产环境集群切换到生产环境集群的方法有:蓝绿部署、A/B测试、金丝雀部署(灰度发布)等方法
- PROD环境:Production environment,生产环境、面向外部用户的环境、连接上互联网既可访问的正式环境
在ASP.NET Core时代,可以为应用程序针对不同的环境,创建不同的解决方案配置文件,当设置当前的环境时,会动态的选择对应的配置文件,这种做法非常好。但对于老旧的Winform程序来说,则没有这样的直接支持,本文介绍了两种方法来实现类似的操作,以摆脱使用一个配置文件针对所有的编译环境时,需要频繁修改配置文件的苦海。
ASP.NET Core的做法
在解决Winform配置之前,先看看更先进的ASP.NET Core时代的做法,它本身就支持多环境配置,并且将所有的配置文件从xml换成了json。这里为了演示,创建一个名为WebConfig的ASP.NET Core MVC应用程序,步骤如下:

新建完成之后,默认会有“appsettings.json”和“appsettings.Development.json”两个配置文件,分别对应"launchSettings.json"里的ASPNETCORE_ENVIRONMENT字段的“Production”和“Development”两个环境。

在appsettings.json和appsettings.Development.json中添加自定义的配置项,添加完成后,appsettings.json的内容如下,该配置文件为生产环境配置:
{
  "Logging": {
    "LogLevel": {
      "Default": "Information",
      "Microsoft.AspNetCore": "Warning"
    }
  },
  "MySettings": {
    "DbConnection": "my prod db connection",
    "Email": "my_prod@domain.com",
    "SMTPPort": "5605"
  },
  "AllowedHosts": "*"
}
appsettings.Development.json的内容如下,该配置文件为开发环境配置:
{
  "Logging": {
    "LogLevel": {
      "Default": "Information",
      "Microsoft.AspNetCore": "Warning"
    }
  },
  "MySettings": {
    "DbConnection": "my development db connection",
    "Email": "my_development@domain.com",
    "SMTPPort": "5605"
  }
}
launchSettings.json中的“ASPNETCORE_ENVIRONMENT”字段指定了当前的环境:
{
  "iisSettings": {
    "windowsAuthentication": false,
    "anonymousAuthentication": true,
    "iisExpress": {
      "applicationUrl": "http://localhost:26467",
      "sslPort": 44398
    }
  },
  "profiles": {
    "http": {
      "commandName": "Project",
      "dotnetRunMessages": true,
      "launchBrowser": true,
      "applicationUrl": "http://localhost:5211",
      "environmentVariables": {
        "ASPNETCORE_ENVIRONMENT": "Development"
      }
    },
    "https": {
      "commandName": "Project",
      "dotnetRunMessages": true,
      "launchBrowser": true,
      "applicationUrl": "https://localhost:7149;http://localhost:5211",
      "environmentVariables": {
        "ASPNETCORE_ENVIRONMENT": "Development"
      }
    },
    "IIS Express": {
      "commandName": "IISExpress",
      "launchBrowser": true,
      "environmentVariables": {
        "ASPNETCORE_ENVIRONMENT": "Development"
      }
    }
  }
}
“ASPNETCORE_ENVIRONMENT”的值除了默认的“Production”对应“appsettings.json”配置文件之外,其它的名称Name对应配置文件中间的名称“appsettings.{Name}.json”,比如“Development”对应“appsettings.Development.json”配置文件。
现在我们对Index页面对应的Controller做一些修改,以显示当前环境对应的数据库字符串连接的值:
public class HomeController : Controller
{
    private readonly ILogger<HomeController> _logger;
    private IConfiguration _configuration;
    public HomeController(ILogger<HomeController> logger, IConfiguration configuration)
    {
        _logger = logger;
        _configuration = configuration;
    }

    public IActionResult Index()
    {
        string dbConnection = _configuration.GetValue<string>("MySettings:DbConnection");
        ViewBag.DbConnection = dbConnection;
        return View();
    }

    public IActionResult Privacy()
    {
        return View();
    }

    [ResponseCache(Duration = 0, Location = ResponseCacheLocation.None, NoStore = true)]
    public IActionResult Error()
    {
        return View(new ErrorViewModel { RequestId = Activity.Current?.Id ?? HttpContext.TraceIdentifier });
    }
}
在HomeController中,添加对配置文件依赖注入_configuration的保存,然后在Action为Index的方法中,获取字符串连接:
string dbConnection = _configuration.GetValue<string>("MySettings:DbConnection");然后将这个值放在ViewBag中。
ViewBag.DbConnection = dbConnection;在Controller对应的View页面中,读取这个ViewBag的值,然后将它显示在页面上,以下是“”Views/Home/Index.cshtml"的内容。
@{
    ViewData["Title"] = "Home Page";
}

<div class="text-center">
    <h1 class="display-4">Welcome</h1>
    <p>Learn about <a href="https://docs.microsoft.com/aspnet/core">building Web apps with ASP.NET Core</a>.</p>
    <h2>DbConnection: @ViewBag.DbConnection </h2>
</div>
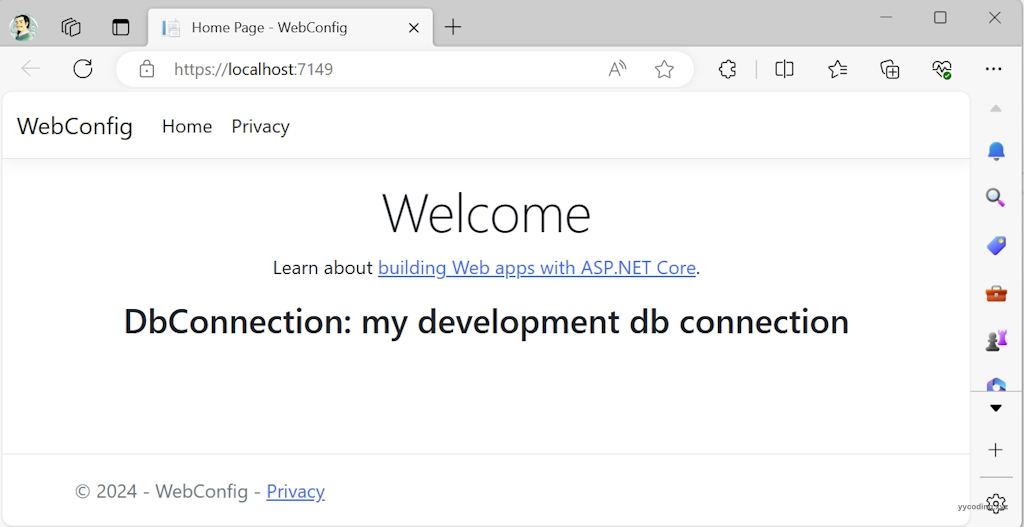
由于在“launchSettings.json”的"ASPNETCORE_ENVIRONMENT"设置的是“Development”环境,所以它会从“appsettings.Development.json”中读取对应的配置文件,运行起来页面上显示如下:
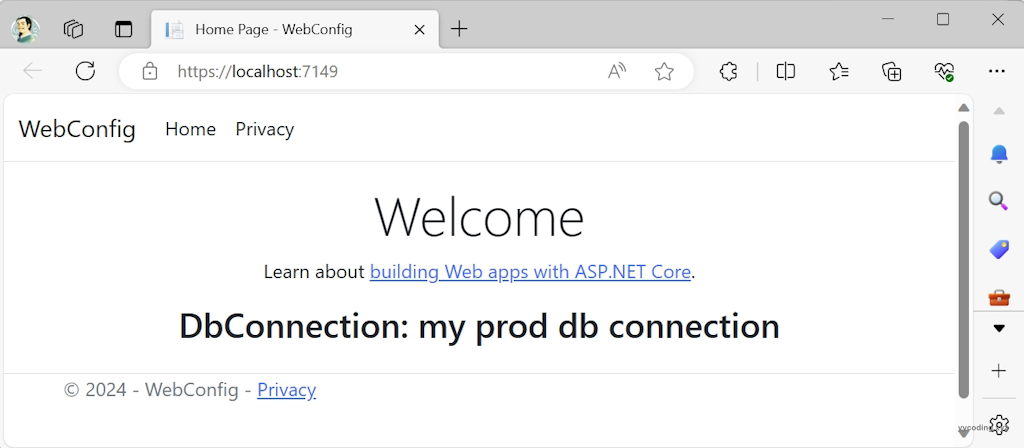
如果将“launchSettings.json”的"ASPNETCORE_ENVIRONMENT"设置为“Production”,它就会去读取“appsettings.json”中的配置项。
{
  "iisSettings": {
    "windowsAuthentication": false,
    "anonymousAuthentication": true,
    "iisExpress": {
      "applicationUrl": "http://localhost:26467",
      "sslPort": 44398
    }
  },
  "profiles": {
    "http": {
      "commandName": "Project",
      "dotnetRunMessages": true,
      "launchBrowser": true,
      "applicationUrl": "http://localhost:5211",
      "environmentVariables": {
        "ASPNETCORE_ENVIRONMENT": "Production"
      }
    },
    "https": {
      "commandName": "Project",
      "dotnetRunMessages": true,
      "launchBrowser": true,
      "applicationUrl": "https://localhost:7149;http://localhost:5211",
      "environmentVariables": {
        "ASPNETCORE_ENVIRONMENT": "Production"
      }
    },
    "IIS Express": {
      "commandName": "IISExpress",
      "launchBrowser": true,
      "environmentVariables": {
        "ASPNETCORE_ENVIRONMENT": "Production"
      }
    }
  }
}
重新运行,结果如下:
现在假设我们新增了一个名为“Staging”的预发布环境,那么也非常简单,只需要添加一个名为“appsettings.Staging.json”的配置文件即可:
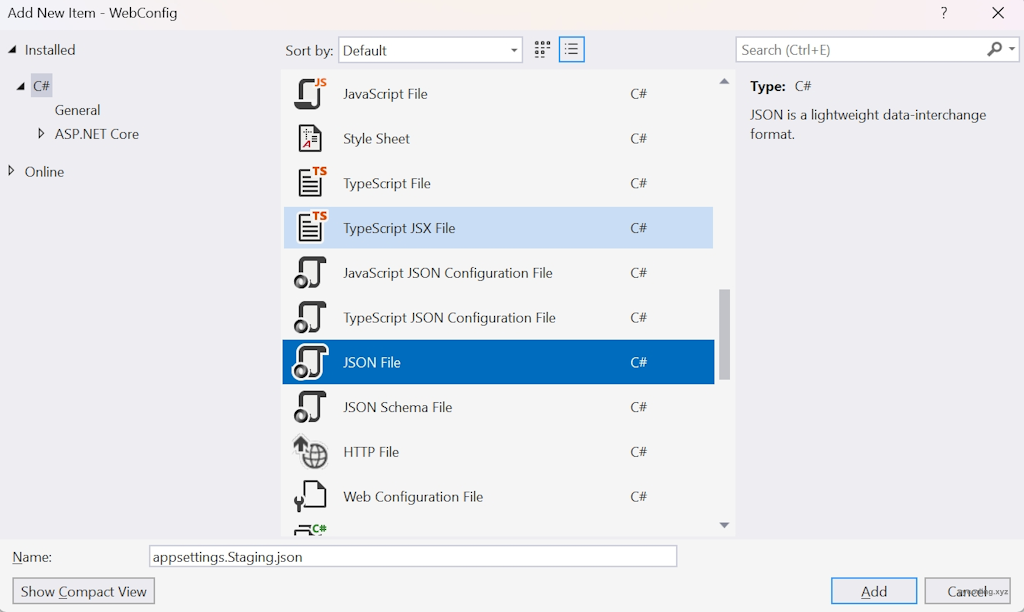
然后修改“appsettings.Staging.json”的内容如下:
{
  "Logging": {
    "LogLevel": {
      "Default": "Information",
      "Microsoft.AspNetCore": "Warning"
    }
  },
  "MySettings": {
    "DbConnection": "my staging db connection",
    "Email": "my_staging@domain.com",
    "SMTPPort": "5605"
  }
}
最后,如果要使用新的Staging环境配置,只需要将“launchSettings.json”的"ASPNETCORE_ENVIRONMENT"设置为“Staging”,它就会去读取“appsettings.Staging.json”中的配置项。
修改后,再次运行,可以看下数据库字符串连接已经切换到了Staging环境的配置。

可以看到由于ASP.NET Core自带这种支持,所以多环境配置相当方便。
Winform中的做法
因为Winform或者WPF相对ASP.NET Core来说,比较“老旧”,所以对于这种多环境配置的情况并没有很好的原生就支持,但有以下两种方法可以实现类似功能。一种是不依赖第三方组件,但要手动修改Visual Studio的项目文件。另外一种是安装一个第三方包来实现。
使用Visual Studio编译后任务实现
如果Visual Studio安装了针对Web项目开发的模版,则它自带一个名为“”的dll,它可以执行一些编译后的任务,其中模型转换就是其功能之一。
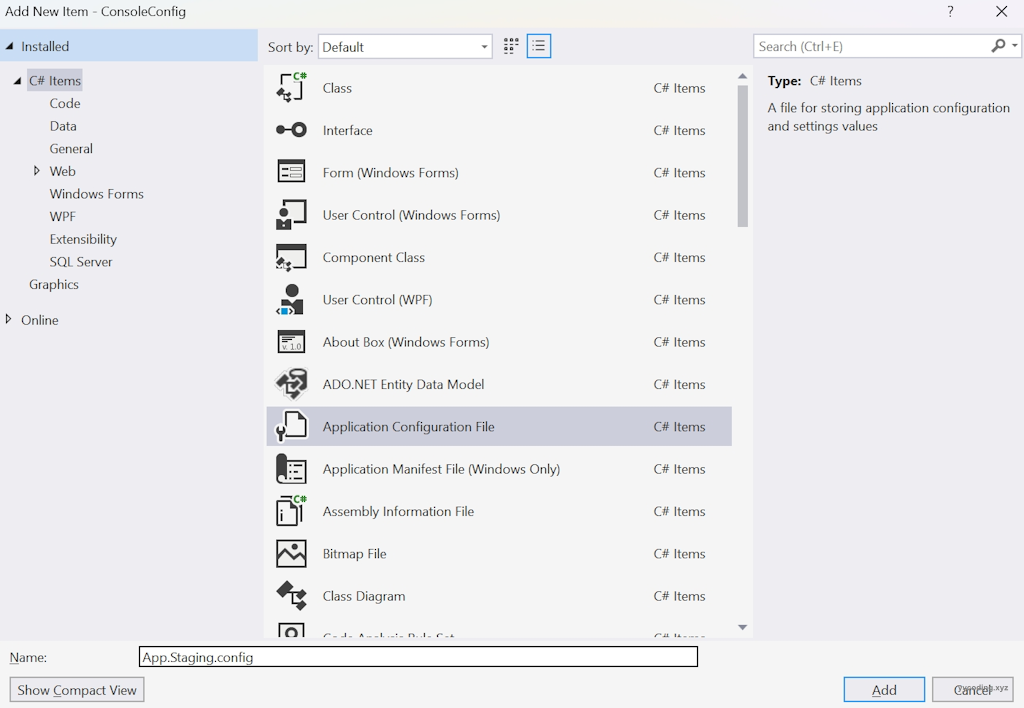
为了演示该功能,我们还是新建一个名为ConsoleConfig的控制台程序,新建完成之后,默认会有一个名为App.config的配置文件,紧接着我们添加另外两个配置文件,名为App.Development.config、App.Staging.config。
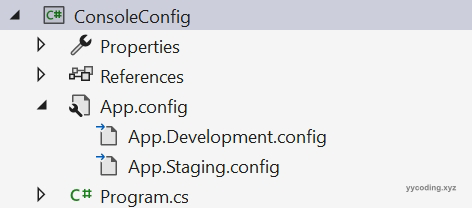
此时项目目录如下:

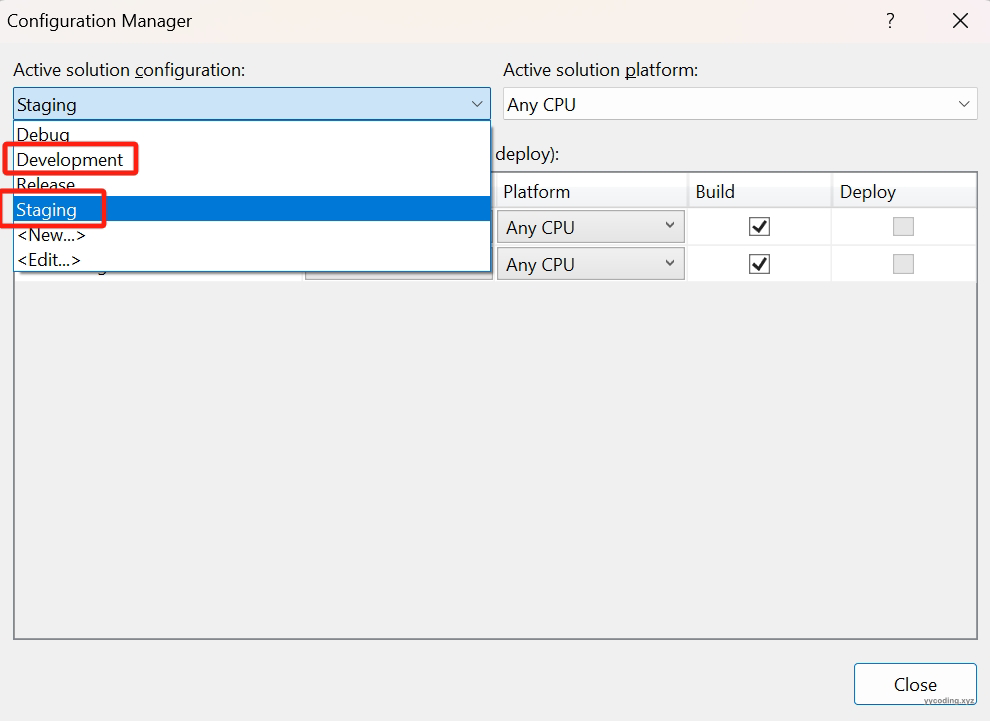
紧接着,在“Build"->"Configuration Manager..."中,新建”Development"和“Staging"配置。
现在,我们需要修改解决方案文件.csproj,所以先卸载项目,然后在Visual Studio中打开项目文件,进行编辑。
<?xml version="1.0" encoding="utf-8"?>
<Project ToolsVersion="15.0" xmlns="http://schemas.microsoft.com/developer/msbuild/2003">
  <Import Project="$(MSBuildExtensionsPath)\$(MSBuildToolsVersion)\Microsoft.Common.props" Condition="Exists('$(MSBuildExtensionsPath)\$(MSBuildToolsVersion)\Microsoft.Common.props')" />
  <PropertyGroup>
    <Configuration Condition=" '$(Configuration)' == '' ">Debug</Configuration>
    <Platform Condition=" '$(Platform)' == '' ">AnyCPU</Platform>
    <ProjectGuid>{7A390B97-7D69-49DD-A710-1D20D9A44440}</ProjectGuid>
    <OutputType>Exe</OutputType>
    <RootNamespace>WinformConfig</RootNamespace>
    <AssemblyName>WinformConfig</AssemblyName>
    <TargetFrameworkVersion>v4.8.1</TargetFrameworkVersion>
    <FileAlignment>512</FileAlignment>
    <AutoGenerateBindingRedirects>true</AutoGenerateBindingRedirects>
    <Deterministic>true</Deterministic>
  </PropertyGroup>
  <PropertyGroup Condition=" '$(Configuration)|$(Platform)' == 'Debug|AnyCPU' ">
    <PlatformTarget>AnyCPU</PlatformTarget>
    <DebugSymbols>true</DebugSymbols>
    <DebugType>full</DebugType>
    <Optimize>false</Optimize>
    <OutputPath>bin\Debug\</OutputPath>
    <DefineConstants>DEBUG;TRACE</DefineConstants>
    <ErrorReport>prompt</ErrorReport>
    <WarningLevel>4</WarningLevel>
  </PropertyGroup>
  <PropertyGroup Condition=" '$(Configuration)|$(Platform)' == 'Release|AnyCPU' ">
    <PlatformTarget>AnyCPU</PlatformTarget>
    <DebugType>pdbonly</DebugType>
    <Optimize>true</Optimize>
    <OutputPath>bin\Release\</OutputPath>
    <DefineConstants>TRACE</DefineConstants>
    <ErrorReport>prompt</ErrorReport>
    <WarningLevel>4</WarningLevel>
  </PropertyGroup>
  <PropertyGroup Condition=" '$(Configuration)|$(Platform)' == 'Development|AnyCPU' ">
    <OutputPath>bin\Dev\</OutputPath>
  </PropertyGroup>
  <PropertyGroup>
    <StartupObject />
  </PropertyGroup>
  <PropertyGroup Condition="'$(Configuration)|$(Platform)' == 'Staging|AnyCPU'">
    <OutputPath>bin\Staging\</OutputPath>
  </PropertyGroup>
  <ItemGroup>
    <Reference Include="System" />
    <Reference Include="System.Core" />
    <Reference Include="System.Xml.Linq" />
    <Reference Include="System.Data.DataSetExtensions" />
    <Reference Include="Microsoft.CSharp" />
    <Reference Include="System.Data" />
    <Reference Include="System.Deployment" />
    <Reference Include="System.Drawing" />
    <Reference Include="System.Net.Http" />
    <Reference Include="System.Windows.Forms" />
    <Reference Include="System.Xml" />
  </ItemGroup>
  <ItemGroup>
    <Compile Include="Program.cs" />
    <Compile Include="Properties\AssemblyInfo.cs" />
    <EmbeddedResource Include="Properties\Resources.resx">
      <Generator>ResXFileCodeGenerator</Generator>
      <LastGenOutput>Resources.Designer.cs</LastGenOutput>
      <SubType>Designer</SubType>
    </EmbeddedResource>
    <Compile Include="Properties\Resources.Designer.cs">
      <AutoGen>True</AutoGen>
      <DependentUpon>Resources.resx</DependentUpon>
      <DesignTime>True</DesignTime>
    </Compile>
	<None Include="App.config" />
    <None Include="App.Development.config" />
    <None Include="App.Staging.config" />
    <None Include="Properties\Settings.settings">
      <Generator>SettingsSingleFileGenerator</Generator>
      <LastGenOutput>Settings.Designer.cs</LastGenOutput>
    </None>
    <Compile Include="Properties\Settings.Designer.cs">
      <AutoGen>True</AutoGen>
      <DependentUpon>Settings.settings</DependentUpon>
      <DesignTimeSharedInput>True</DesignTimeSharedInput>
    </Compile>
  </ItemGroup>
  <Import Project="$(MSBuildToolsPath)\Microsoft.CSharp.targets" />
</Project>
现在需要将:
<None Include="App.config" />
<None Include="App.Development.config" />
<None Include="App.Staging.config" />
修改为:
<None Include="App.config" />
<None Include="App.Development.config" >
	<DependentUpon>App.config</DependentUpon>
</None>
<None Include="App.Staging.config" >
	<DependentUpon>App.config</DependentUpon>
</None>
并且在倒数第二行"<Import Project..."的后面添加内容,添加后的内容如下:
<Import Project="$(MSBuildToolsPath)\Microsoft.CSharp.targets" />
<UsingTask TaskName="TransformXml" AssemblyFile="$(MSBuildExtensionsPath)\Microsoft\VisualStudio\v$(VisualStudioVersion)\Web\Microsoft.Web.Publishing.Tasks.dll" />
<Target Name="AfterCompile" Condition="exists('app.$(Configuration).config')">
	<!-- Generate transformed app config in the
           intermediate directory -->
	<TransformXml Source="app.config" Destination="$(IntermediateOutputPath)$(TargetFileName).config" Transform="app.$(Configuration).config" />
	<!-- Force build process to use the transformed configuration
           file from now on. -->
	<ItemGroup>
		<AppConfigWithTargetPath Remove="app.config" />
		<AppConfigWithTargetPath Include="$(IntermediateOutputPath)$(TargetFileName).config">
			<TargetPath>$(TargetFileName).config</TargetPath>
		</AppConfigWithTargetPath>
	</ItemGroup>
</Target>
将修改后的解决方案文件保存,然后重新加载项目文件,可以看到解决方案如下。
现在编辑App.Development.config文件,修改后的内容如下:
<?xml version="1.0" encoding="utf-8" ?>
<configuration xmlns:xdt="http://schemas.microsoft.com/XML-Document-Transform">
	<appSettings>
		<add key="DbConnection" value="my development db connection" xdt:Transform="Replace" xdt:Locator="Match(key)"/>
		<add key="Email" value="my_development@domain.com" xdt:Transform="Replace" xdt:Locator="Match(key)"/>
		<add key="SMTPPort" value="5605" xdt:Transform="Replace" xdt:Locator="Match(key)"/>
	</appSettings>
</configuration>
注意看,在configuration的名字空间变为了xmlns:xdt,内容为xml文件转换。
在下面的key里,除了key和value之外,xdt:transform设置为了Replace,表示替换,xdt:Locator设为了Match(key),表示按照key来匹配。
同样,修改App.Staging.config文件,内容如下:
<?xml version="1.0" encoding="utf-8" ?>
<configuration xmlns:xdt="http://schemas.microsoft.com/XML-Document-Transform">
	<appSettings>
		<add key="DbConnection" value="my staging db connection" xdt:Transform="Replace" xdt:Locator="Match(key)"/>
		<add key="Email" value="my_staging@domain.com" xdt:Transform="Replace" xdt:Locator="Match(key)"/>
		<add key="SMTPPort" value="5605" xdt:Transform="Replace" xdt:Locator="Match(key)"/>
	</appSettings>
</configuration>
现在,在Main方法里读取DbConnection字符串并显示:
static void Main()
{
    string dbconn = System.Configuration.ConfigurationManager.AppSettings["DbConnection"];
    Console.WriteLine("current db connection is:" + dbconn);
    Console.ReadKey();
}
现在,将环境设置为Staging,然后编译:
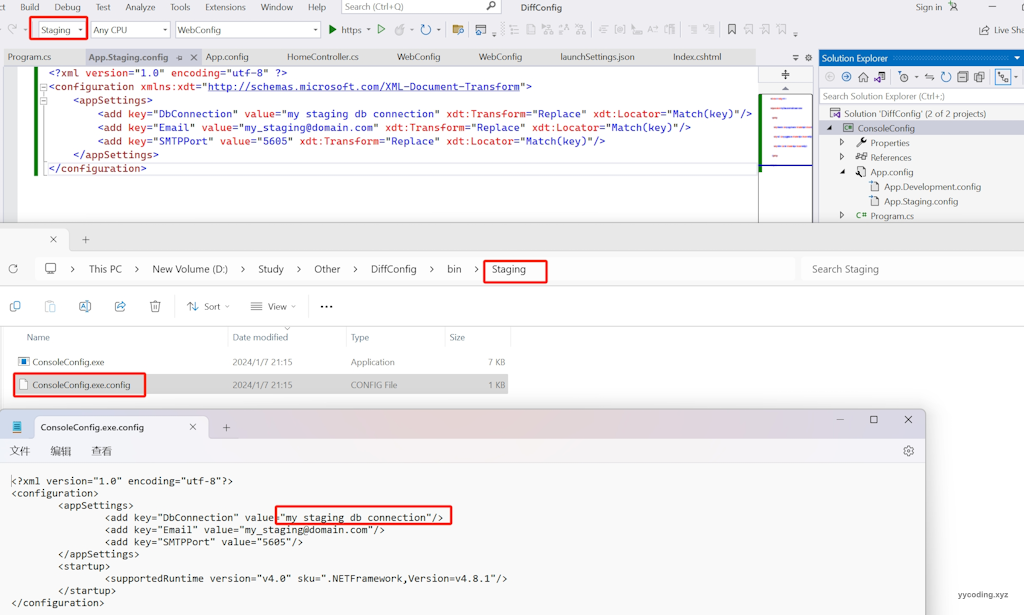
可以看到,在编译后的目录下的配置文件”ConsoleConfig.exe.config“里面的内容已经被替换为了"App.Staging.config"里面的内容了,运行程序可以看到能够正确读取到配置项。

现在,将编译环境切换为”Development",编译后可以看到已经被替换为了“App.Development.config”里面的配置项了:

现在如果切换为其它的编译环境,比如“Debug”或者“Release",因为没有对应的”App.Debug.config“或者”App.Release.config“,所以会默认匹配到App.config里面的配置,这也是理所当然。
上面这种方法,其实是利用到了编译后任务,它会用到”Microsoft.Web.Publishing.Task.dll“:
<UsingTask TaskName="TransformXml" AssemblyFile="$(MSBuildExtensionsPath)\Microsoft\VisualStudio\v$(VisualStudioVersion)\Web\Microsoft.Web.Publishing.Tasks.dll" />如果Visual Studio在安装的时候,没有选择Web相关的开发模块,则可能本机上不存在该dll,这样编译项目的时候就会提示找不到dll,从而无法实现以上的动态替换配置文件的功能。另外该功能的实现,需要手动编辑项目文件,容易出错。但这种方法的好处是,不需要依赖第三方的模块就可以实现。
要解决这两个问题,则需要用到下面介绍的方法,就是第三方包slow-cheetah
使用第三方包slow-cheetch实现
有时候可能只需要开发Winform项目,Visual Studio中根本就没有安装Web相应的模块。为了使用这个不同的配置项,强制要求安装Web开发模块可能很不方便,另外,手动修改解决方案配置文件也可能比较麻烦。现在使用第三方的Nuget包slow-cheetch也能实现类似的功能了。
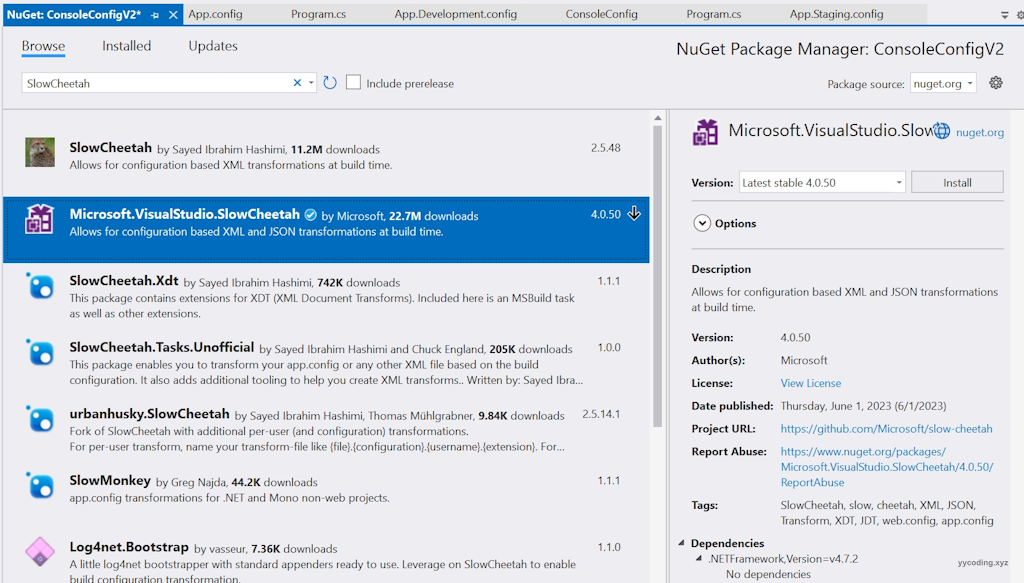
为了演示功能,现在新建一个ConsoleConfigV2的.NET Framework项目,然后添加Nuget包SlowCheetah:
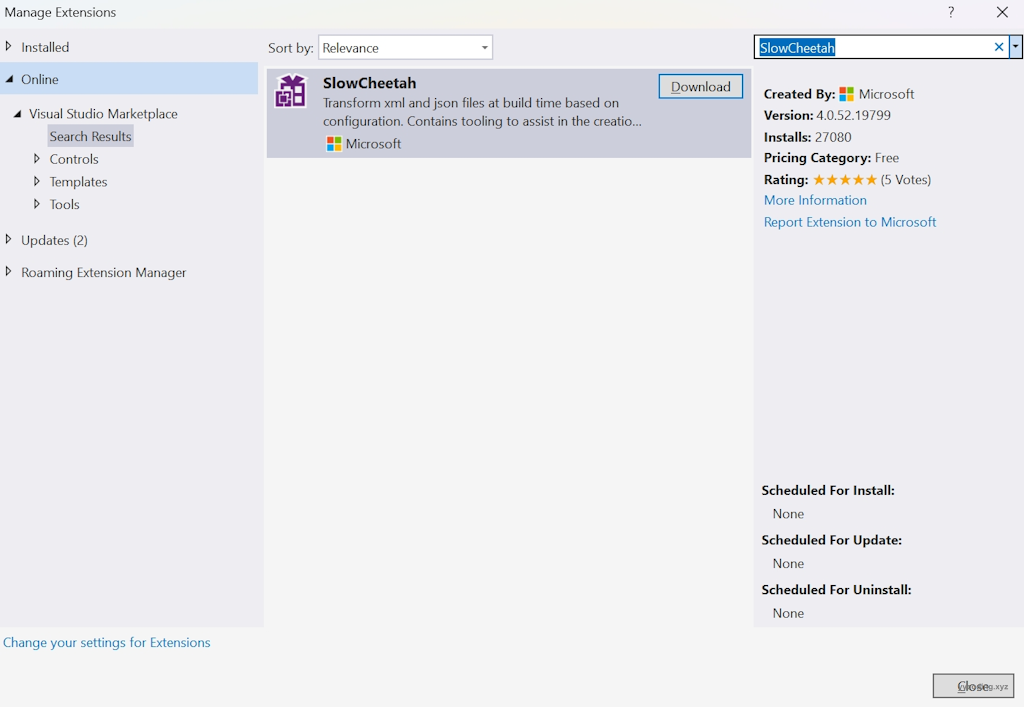
然后为Visual Studio安装SlowCheetah插件,方法是打开 vs 扩展商店搜索SlowCheetah,然后点击下载安装。
安装完成之后,在App.config文件上右键单击,然后选择”Add Transform“。

点击AddTransform后,会默认生成“App.Debug.config"和”App.Release.config"。然后编辑Debug和Release两个配置文件如下:
“App.Debug.config”文件修改如下:
<?xml version="1.0" encoding="utf-8"?>
<!--For more information on using transformations see the web.config examples at http://go.microsoft.com/fwlink/?LinkId=214134. -->
<configuration xmlns:xdt="http://schemas.microsoft.com/XML-Document-Transform">
	<appSettings>
		<add key="DbConnection" value="my debug db connection" xdt:Transform="Replace" xdt:Locator="Match(key)"/>
		<add key="Email" value="my_debug@domain.com" xdt:Transform="Replace" xdt:Locator="Match(key)"/>
		<add key="SMTPPort" value="5605" xdt:Transform="Replace" xdt:Locator="Match(key)"/>
	</appSettings>
</configuration>
“App.Release.config”文件修改如下:
<?xml version="1.0" encoding="utf-8"?>
<!--For more information on using transformations see the web.config examples at http://go.microsoft.com/fwlink/?LinkId=214134. -->
<configuration xmlns:xdt="http://schemas.microsoft.com/XML-Document-Transform">
	<appSettings>
		<add key="DbConnection" value="my release db connection" xdt:Transform="Replace" xdt:Locator="Match(key)"/>
		<add key="Email" value="my_release@domain.com" xdt:Transform="Replace" xdt:Locator="Match(key)"/>
		<add key="SMTPPort" value="5605" xdt:Transform="Replace" xdt:Locator="Match(key)"/>
	</appSettings>
</configuration>
修改完成之后,点击“App.Debug.config”,右键选择“Preview Transform”还可以预览变更。

现在,直接以“debug”模式编译程序。
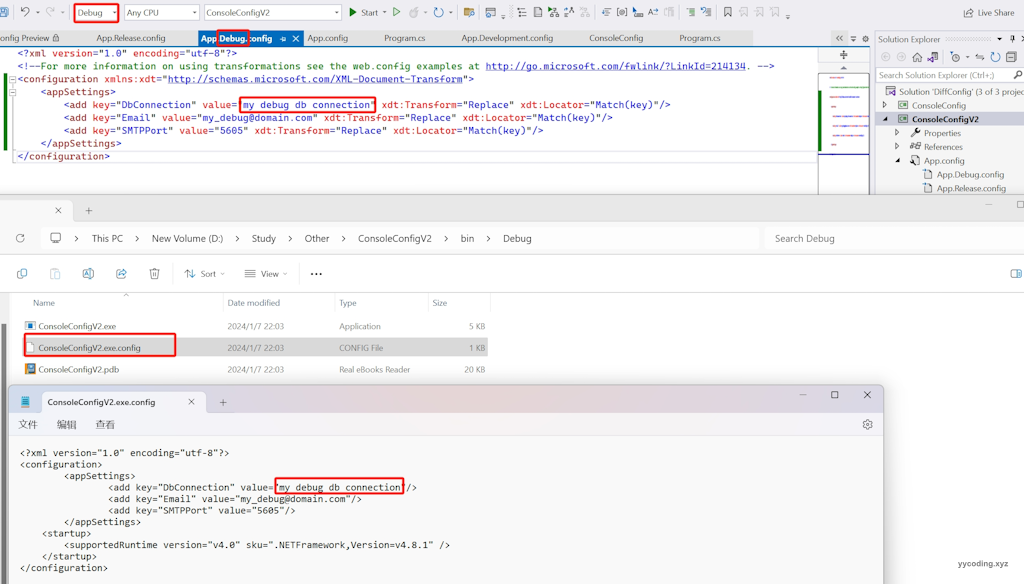
可以看到,"App.Debug.config"里面的配置项在Debug模式下,已经正确的替换了编译后的配置文件。
总结
在开发应用程序的时候,会有不同的解决方案配置,在ASP.NET Core时代,针对不同环境的不同配置,Visual Studio原生提供了很好的支持,但对于Winform来说,要实现多环境不同配置则需要花一些功夫。本文首先演示了ASP.NET Core里面如何针对不同的环境配置不同的配置文件,紧接着介绍了在Winform中使用Visual Studio编译后任务的功能,通过手动修改项目文件来实现了不同的编译环境的不同配置,最后针对Visual Studio编译后任务实现不同环境不同配置文件的两个缺点,介绍了使用SlowCheetah第三方插件,结合SlowCheetah的Visual Studio的插件来实现这一功能,简单方便依赖少。希望本文对您了解这一功能有所帮助。
参考:
https://www.codeproject.com/articles/1103330/how-to-transform-different-config-file-without-any
https://www.cnblogs.com/ohzxc/p/16484986.html
https://github.com/microsoft/slow-cheetah
https://amolpandey.com/2021/01/05/multiple-app-config-in-c-solution-based-on-build-selection/
https://github.com/microsoft/slow-cheetah
https://www.cnblogs.com/skyangell/archive/2013/01/15/2861579.html
https://www.cnblogs.com/hnzhengfy/p/DSPConfig.html
https://mp.weixin.qq.com/s/zrxgI2KJ0wouMpkIvLwB5A