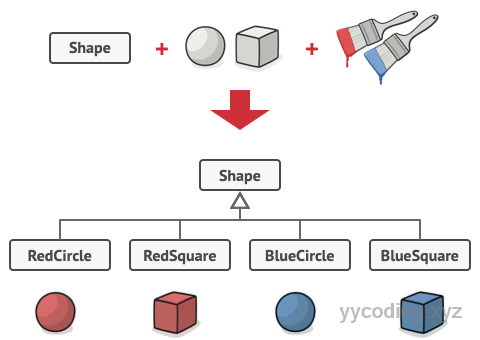
在软件设计中,有一个很常见的问题是“状态空间爆炸”(state space explosion),即同一个对象的多个不想关的实体,用来表示所有可能的状态时,就会出现笛卡尔乘积式的问题。比如,假如我们有不同颜色的红色、蓝色(状态1)不同形状的(状态2)圆形、矩形对象,就要写四个类,比如RedSquare、BlueSquare、RedCircle、BlueCircle。如果增加一种形状,就要增加2个类,增加一种颜色,也要增加2各类。
我们要做的其实就是把一个事物的两个方面“组合”在一起,有多种方法能实现这一点,例如,如果颜色是一个简单特性,我们可以将颜色定义为枚举,如果颜色是可变属性、字段或行为我们就不能把他定义为枚举了。如果硬要这么做,要么代码里会出现很多if..else或者switch,这些分支语句里包含了其他一些不想关的类,显然这些都不是我们想要的解决方案。
Bridge桥接模式的核心,就是通过引用来将一个对象的不同方面连接在一起。下面举几个例子来说明桥接模式。

普通桥接模式
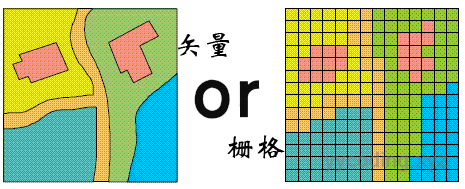
假设我们要在屏幕上绘制不同的图形。假设我们已经有了很多图形,比如圆形 (Circle),正方形 (Square),以及不同的方式来在屏幕上渲染他们,比如有栅格渲染 (Raster)、矢量渲染(Vector)。我本人之前是学习GIS的,这里面有一个很重要的概念就是栅格和矢量。
现在我们要绘制不同的图形以及同时支持不同的渲染方式。如何实现这一功能?当然我们可以按照之前的定义一些列类来分别表格图形和渲染方法的枚举,比如RasterSquare,VectorSquare,RasterCircle,RasterSquare等,并提供各自的实现。这种方式的问题在本文开头已经说过了,对于新增一个对象,代码会产生笛卡尔乘法式的增多。
解决方法就是采用桥接模式,将一个对象的不同变化部分分解并抽象,然后对这些抽象进行引用。
首先将渲染方式进行抽象,这里先抽象出IRender接口。
public interface IRenderer
{
    public void RenderCircle(float para);
    //RenderSquare ...
    //RenderRectangle
}
然后将实体对象抽象化为Shape对象,并引用上述接口。
public abstract class Shape
{
    protected IRenderer render;
    public Shape(IRenderer s)
    {
        render = s;
    }

    public abstract void Draw();

    public abstract void Resize(float factor);
}
看起来很奇怪,但是我们试图解决了两个问题,当增加新的渲染方式,和增加新的形状时:
- 当增加新的形状,我们只需要继承自Shape,并实现其成员方法即可,假设Shape有M个方法,这里增加了M个变动。另外,Render里也要支持对新增加成员的支持方法,假设N个方法,总的变动就是M+N。
- 当增加新的渲染方式时,只需要实现M个形状的渲染,变动为M。
可见,我们的修改点,要么为M+N,要么为M个,而不是之前的M*N。另一个好处在于Render总是知道如何渲染所有的图形,因为每一个Shape对象都有一个Draw方法,并且在内部会调用RenderXXX方法。
比如针对Circle,实现如下:
public class Circle : Shape
{
    private float radius;
    public Circle(IRenderer render, float radius) : base(render)
    {
        this.radius = radius;
    }
    public override void Draw()
    {
        render.RenderCircle(radius);
    }

    public override void Resize(float factor)
    {
        radius *= factor;
    }
}
注意到,在Draw()方法中,我们使用的是IRender里面的RenderCircle方法,这就是应用Bridge桥接模式的地方。
接下来实现具体Renderer:
public class VectorRenderer : IRenderer
{
    public void RenderCircle(float radius)
    {
        Console.WriteLine($"Drawing a circle with radius {radius} using vector rendered");
    }
}

public class RasterRenderer : IRenderer
{
    public void RenderCircle(float radius)
    {
        Console.WriteLine($"Drawing a circle with radius {radius} using pixels rendered");
    }
}
使用方法如下:
VectorRenderer vectorRender = new VectorRenderer();
Circle c = new Circle(vectorRender, 0.5f);
c.Draw();
c.Resize(2);
c.Draw();

RasterRenderer rasterRender = new RasterRenderer();
c = new Circle(rasterRender, 1);
c.Draw();
c.Resize(2);
c.Draw();
输出结果如下:
Drawing a circle with radius 0.5 using vector rendered
Drawing a circle with radius 1 using vector rendered
Drawing a circle with radius 1 using pixels rendered
Drawing a circle with radius 2 using pixels rendered
抽象及实现
在GOF这本书里,说桥接模式的本质:
将抽象部分与它的实现部分分离,使他们都可以独立地变化。
单看这句话,这可能不太好理解。在上面的例子中,我们抽象出了Shape抽象类,以及IRenderer接口,可以从Shape抽象类派生出具体类型,可以实现IRenderer接口实现新的渲染方式,这两者可以独立变化。
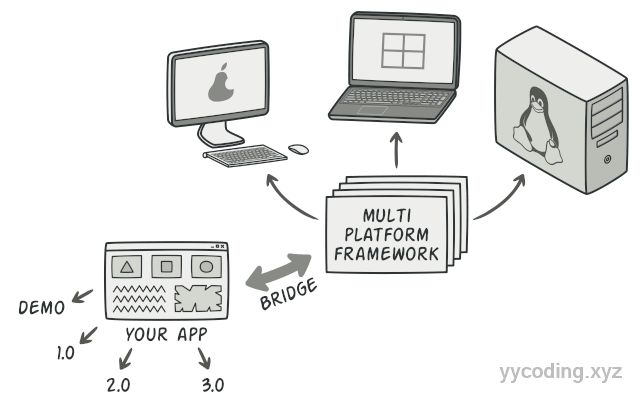
下面再举一个应用程序的例子。我们的图形用户界面UI,可以认为是一种抽象(Abstraction),而实现(Implementation)部分则是底层操作系统代码 (API), GUI 层调用 API 层来对用户的各种操作做出响应。一般来说, 可以在两个独立方向上扩展这种应用:
- 开发多个不同的GUI应用,比如针对用户,和针对管理员的UI可能不一样。针对Web和针对Mobile移动设备的UI可能不一样。
- 支持多种不同的API,比如可以跨多个平台,能在Windows,Linux,Mac上运行。
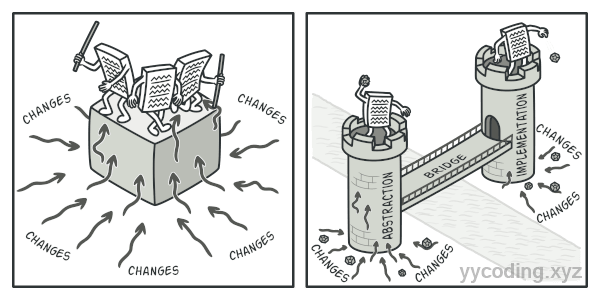
▲ 从杂糅的代码面对变化焦头烂额,到提取变化部分各个击破,图片来自refactoring.guru
糟糕的实现,就是UI和各自API混杂在一起。
可以将特定接口平台的组合代码放到单独的类中,但很快会发现这种类的数量会很多。类的层次会以指数形式增长,添加新的GUI或者支持一种新的API都需要创建更多的类。就如在前面的例子中,如果不抽像出层级,则增加新的形状和渲染模式,就会增加很多代码。
可以使用桥接模式来解决这个问题,比如,可以将类拆分为两个层次结构:
- 抽象部分:程序的GUI层
- 实现部分:操作系统的API
抽象部分控制程序的外观,并将实际工作委派给接入的实现对象,不同的平台实现,只要遵循相同的接口就可以互换,比如可以使得同一GUI可以在Windows和Linux下运行。
▲ 将基础UI部分作为抽象,将基础功能提取出接口API,这样能面对UI变化和底层实现变化,图片来自refactoring.guru
这样,如果要新增一个对新的操作系统的支持,只需要创建子类,实现API接口对象即可。
代码实现
桥接模式通过以上两个例子,很容易理解,再举一个例子,比如需要创建一个支持遥控的家用电器,我们可以创建一个RemoteControl抽象类,然后定义一个IDevice接口,IDevice接口包含一些指令,比如设置音量,静音,切换频道等等。RemoteControl抽象类里提供,增加音量,降低音量,静音,切换频道等。这些方法,在内部调用IDevice接口里的方法来实现。如果要新增支持遥控的设备,只需要实现IDevice接口;如果要新增一个高级的遥控器,比如能够声控的遥控器,只需要扩展实现RemoteControl提供额外的声控实现即可,非常简单。下面则个是桥接模式的模板方法,来自https://refactoring.guru/design-patterns/bridge/csharp/example 。
// The Abstraction defines the interface for the "control" part of the two
// class hierarchies. It maintains a reference to an object of the
// Implementation hierarchy and delegates all of the real work to this
// object.
class Abstraction
{
    protected IImplementation _implementation;

    public Abstraction(IImplementation implementation)
    {
        this._implementation = implementation;
    }

    public virtual string Operation()
    {
        return "Abstract: Base operation with:\n" +
            _implementation.OperationImplementation();
    }
}

// You can extend the Abstraction without changing the Implementation
// classes.
class ExtendedAbstraction : Abstraction
{
    public ExtendedAbstraction(IImplementation implementation) : base(implementation)
    {
    }

    public override string Operation()
    {
        return "ExtendedAbstraction: Extended operation with:\n" +
            base._implementation.OperationImplementation();
    }
}

// The Implementation defines the interface for all implementation classes.
// It doesn't have to match the Abstraction's interface. In fact, the two
// interfaces can be entirely different. Typically the Implementation
// interface provides only primitive operations, while the Abstraction
// defines higher- level operations based on those primitives.
public interface IImplementation
{
    string OperationImplementation();
}

// Each Concrete Implementation corresponds to a specific platform and
// implements the Implementation interface using that platform's API.
class ConcreteImplementationA : IImplementation
{
    public string OperationImplementation()
    {
        return "ConcreteImplementationA: The result in platform A.\n";
    }
}

class ConcreteImplementationB : IImplementation
{
    public string OperationImplementation()
    {
        return "ConcreteImplementationA: The result in platform B.\n";
    }
}

class Client
{
    // Except for the initialization phase, where an Abstraction object gets
    // linked with a specific Implementation object, the client code should
    // only depend on the Abstraction class. This way the client code can
    // support any abstraction-implementation combination.
    public void ClientCode(Abstraction abstraction)
    {
        Console.Write(abstraction.Operation());
    }
}

class Program
{
    static void Main(string[] args)
    {
        Client client = new Client();

        Abstraction abstraction;
        // The client code should be able to work with any pre-configured
        // abstraction-implementation combination.
        abstraction = new Abstraction(new ConcreteImplementationA());
        client.ClientCode(abstraction);

        Console.WriteLine();

        abstraction = new ExtendedAbstraction(new ConcreteImplementationB());
        client.ClientCode(abstraction);
    }
}
参考资料
https://www.codeproject.com/Articles/434352/Understanding-and-Implementing-Bridge-Pattern-in-C
https://refactoring.guru/design-patterns/bridge
https://visualstudiomagazine.com/Articles/2013/11/07/the-net-bridge-pattern.aspx?Page=1