
最近在看操作系统设计与实现这门公开课,里面使用的环境是Linux。在课程开始,还特别提到如果对Linux不熟悉,可以了解MIT 的The Missing Semester of Your CS Education这门课。我就在上下班路上看这些视频,同时也在看C++相关的书籍。
学习C++或者说操作系统这个东西,除了理论的学习,最重要的就是练习和实践“无他,唯手熟尔”。之前学习和工作的平台也都是Windows,最近拿家里的旧笔记本置换了一台洋垃圾Panasonic的CF-SV,胜在“轻厚”和可拆卸更换电池。本来准备在上面安装一个Linux环境,但是担心有时候还是需要Windows环境来处理工作。

▲ why not use windows?
要保留Windows系统,还可以使用Linux环境,在以前有两种方案:
- 安装双系统,在计算机启动时,选择启动哪个操作系统。Ubuntu在安装的时候就提供了这种选择,它能保持两个系统同时存在于计算机上,且文件系统相互看不见。
- 安装虚拟机,然后在虚拟机里面安装Linux操作系统。虚拟机比如VMware,以及VirtualBox都是不错的选择。
我在很久以前尝试过这两种方法,第一种问题在于当切换到Windows后就会发现硬盘少了一部分空间,第二种就是有时候感觉非常慢,而且占用的磁盘空间比较大。
幸运的是,随着Windows开始拥抱Linux,Windows 10、11操作系统里面内置了Windows Subsystem For Linux(WSL)模块,可以很方便的在Windows上使用和体验Linux,并且资源开销相对于虚拟机来说要小的多,相当于在Windows上安装了一个名为Ubuntu的应用,并且可以在Windows上直接访问和查看Linux下面的文件系统。初步体验下来还是非常友好和方便的,Linux操作起来比Windows更加直接和高效。我这里记录一下在Windows 11上启用WSL,安装Ubuntu,以及Ubuntu里面搭建C++开发环境的步骤,算是一个笔记,后面在熟悉Linux操作系统以及学习C++的时候,直接就使用WSL里面的Ubuntu。
启用WSL环境
首先Windows操作系统的版本必须是Windows 10及以上版本,我这里是Windows 11。WSL也分为1.0和2.0版本.
首先要确认CPU是否支持虚拟化:

▲确认CPU已开启虚拟化功能,如果没开启需要在BIOS里设置
然后打开这几个功能:Hyper-V、Virtual Machine Platform以及Windows Subsytem for Linux。

▲打开wsl需要用到的三个功能
然后计算机需要重新启动。
安装完成之后,在管理员在PowerShell里面输入以下命令,即可安装wsl和配置wsl 为2.0:
PS C:\Users\yangecnu> wsl --install
Windows Subsystem for Linux is already installed.
The server name or address could not be resolved
PS C:\Users\yangecnu> wsl --set-default-version 2
For information on key differences with WSL 2 please visit https://aka.ms/wsl2
The operation completed successfully.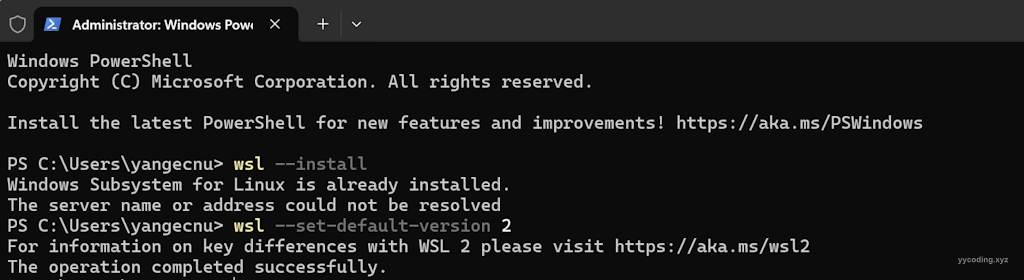
安装Linux发行版
可以通过命令行安装,也可以通过应用商店直接安装。命令行安装的方法如下:
用管理员权限运行PowerShell,输入以下命令:
wsl --list --online如果输出解析不到:
The server name or address could not be resolved它其实要去访问raw.githubusercontent.com,通常情况下应该是访问不到的。可以修改host里面的内容或者修改DNS为114.114.114.114和8.8.8.8。

▲手动设置DNS地址
PS C:\Users\yangecnu> wsl --list --online
The operation timed out
PS C:\Users\yangecnu> ping raw.githubusercontent.com
Ping request could not find host raw.githubusercontent.com. Please check the name and try again.
PS C:\Users\yangecnu> ping raw.githubusercontent.com
Pinging raw.githubusercontent.com [185.199.110.133] with 32 bytes of data:
Reply from 185.199.110.133: bytes=32 time=199ms TTL=49
Reply from 185.199.110.133: bytes=32 time=168ms TTL=49
Reply from 185.199.110.133: bytes=32 time=158ms TTL=49
Request timed out.

Ping statistics for 185.199.110.133:
    Packets: Sent = 4, Received = 3, Lost = 1 (25% loss),
Approximate round trip times in milli-seconds:
    Minimum = 158ms, Maximum = 199ms, Average = 175ms
可以看到修改完了DNS之后就能正常访问了,接下来重复执行如下命令:
PS C:\Users\yangecnu> wsl --list --online
The following is a list of valid distributions that can be installed.
Install using 'wsl --install -d <Distro>'.

NAME                                   FRIENDLY NAME
Ubuntu                                 Ubuntu
Debian                                 Debian GNU/Linux
kali-linux                             Kali Linux Rolling
Ubuntu-18.04                           Ubuntu 18.04 LTS
Ubuntu-20.04                           Ubuntu 20.04 LTS
Ubuntu-22.04                           Ubuntu 22.04 LTS
OracleLinux_7_9                        Oracle Linux 7.9
OracleLinux_8_7                        Oracle Linux 8.7
OracleLinux_9_1                        Oracle Linux 9.1
openSUSE-Leap-15.5                     openSUSE Leap 15.5
SUSE-Linux-Enterprise-Server-15-SP4    SUSE Linux Enterprise Server 15 SP4
SUSE-Linux-Enterprise-15-SP5           SUSE Linux Enterprise 15 SP5
openSUSE-Tumbleweed                    openSUSE Tumbleweed
可以看到,有很多发行版本可以选择,这里选择Ubuntu-22.04,输入以下命令:
wsl --install -d Ubuntu-22.04可以看到安装完成之后:
PS C:\Users\yangecnu> wsl --install -d Ubuntu-22.04
Installing: Ubuntu 22.04 LTS
Ubuntu 22.04 LTS has been installed.
Launching Ubuntu 22.04 LTS...
立即启动了Ubuntu,但是在打开的Ubuntu的终端中,出现了错误:
Installing, this may take a few minutes...
WslRegisterDistribution failed with error: 0x800701bc
Error: 0x800701bc WSL 2 requires an update to its kernel component. For information please visit https://aka.ms/wsl2kernel

Press any key to continue...
这个错误提示需要对WSL 2进行一个升级。可以参考 Download the Linux kernel update package下载最新的更新包WSL2 Linux kernel update package for x64 machines下载完成之后,直接双击运行即可。
安装完成之后,重新运行命令,
wsl --install -d Ubuntu-22.04即可看到Ubuntu能够正确安装和打开:
Installing, this may take a few minutes...
Please create a default UNIX user account. The username does not need to match your Windows username.
For more information visit: https://aka.ms/wslusers
Enter new UNIX username: yy
New password:
Retype new password:
passwd: password updated successfully
Installation successful!
Windows Subsystem for Linux is now available in the Microsoft Store!
You can upgrade by running 'wsl.exe --update' or by visiting https://aka.ms/wslstorepage
Installing WSL from the Microsoft Store will give you the latest WSL updates, faster.
For more information please visit https://aka.ms/wslstoreinfo

To run a command as administrator (user "root"), use "sudo <command>".
See "man sudo_root" for details.

Welcome to Ubuntu 22.04.3 LTS (GNU/Linux 5.10.16.3-microsoft-standard-WSL2 x86_64)

 * Documentation:  https://help.ubuntu.com
 * Management:     https://landscape.canonical.com
 * Support:        https://ubuntu.com/advantage

This message is shown once a day. To disable it please create the
/home/yy/.hushlogin file.
yy@LAPTOP-3O6FQOOC:~$
在安装的过程中,要求输入用户名和密码。输入完成之后,就能在PowerShell的终端里正常使用命令行的方式访问Ubuntu系统了,需要注意的是,这个Ubuntu并没有UI界面,只有一个命令行界面,但是这也是高效Linux操作的基本。
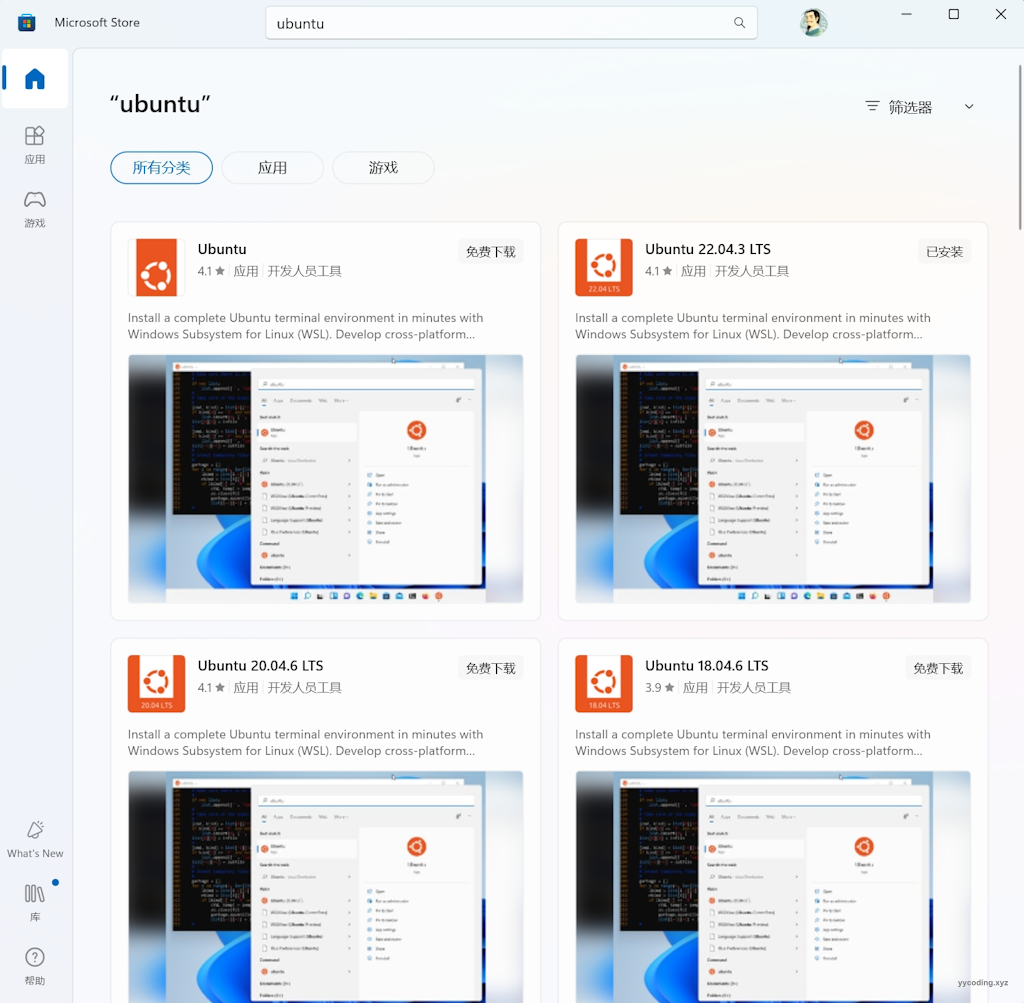
通过商店安装的方式就是直接在商店里搜索,然后点击安装,感觉这个方式远没有通过命令行安装的方式快捷。
安装Windows Terminal
为了能更方便友好的操作Ubuntu,可以安装一个Windows Terminal,它相当于把你本机的所有终端都集合在一起了,并且支持Tab页的方式打开多个终端。这个软件类似于Cmder。

安装完成之后,可以看到在下拉框里面可以选择打开终端的类型。

还可以设置Windows的默认终端为Windows Terminal。

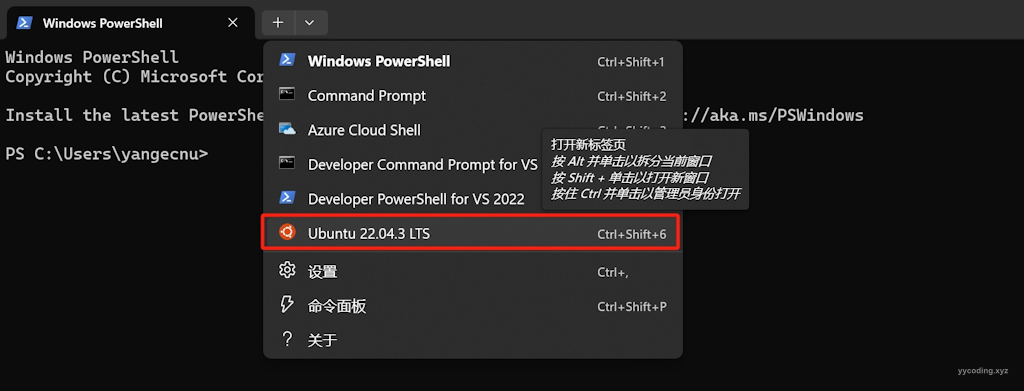
更新Ubuntu
首次安装完成之后,通常需要执行一些更新,我们在Windows Terminal中选择运行“Ubuntu 22.04 LTS”
然后执行:
sudo apt-get update或者
sudo apt-get update && sudo apt-get dist-upgrade
配置C++开发环境
关于在WSL中使用VSCode配置C++开发环境,完全可以参考MSDN上的这篇文章GCC on Windows Subsystem for Linux,只需要一条命令就可以把C++的环境搭建起来:
sudo apt-get install build-essential gdb通过该命令,安装guc编译器和gdb调试器。
完成之后,通过如下命令检查环境是否安装成功:
gcc --version
g++ --version
gdb --version
或者通过whereis命令查看:
whereis g++
whereis gcc
whereis gdb
以上命令,在我的电脑上的输出结果如下:

在开发C++之前,我们要规划好目录结构。
可以看到,但打开终端时,当前的目录结构默认是在/home/yy下面的,可以使用pwd(print work directory)来查看:
yy@LAPTOP-3O6FQOOC:~$ pwd
/home/yy
这个目录就是用户的目录。现在我计划在这个下面新建一个名为cppstudy的目录,专门存放用来练习C++的项目。在这个下面我可能会看一些C++的教材,比如我正在看的《C++程序设计语言,第四版》,我在做里面的练习时,会给这个书专门起一个名字,比如叫cpplanguage_4thedition:使用mkdir命令即可创建目录。
yy@LAPTOP-3O6FQOOC:~$ mkdir cpplanguage_4thedition
yy@LAPTOP-3O6FQOOC:~$ ls
cpplanguage_4thedition
紧接着,在该目录下,创建一个模板项目,在Visual Studio Code中,每个项目最好以一个文件夹的形式分开,比如创建一个cppenv的目录用来存放模板项目,后续的项目只需要将这个目录拷贝一份重命名即可。模板文件主要是用来配置VS Code里面使用的C++编译器、调试器等的配置。
首先使用cd命令切换到新建的cpplanguage_4thedition目录,在输入目标目录时不必全部输全,只需要输入前面几个字母,然后按TAB键,就能自动补全:
yy@LAPTOP-3O6FQOOC:~$ cd cpplanguage_4thedition/
yy@LAPTOP-3O6FQOOC:~/cpplanguage_4thedition$ mkdir cppenv
yy@LAPTOP-3O6FQOOC:~/cpplanguage_4thedition$ ls
cppenv
现在,要在cppenv目录下打开VS Code只需要执行:
yy@LAPTOP-3O6FQOOC:~/cpplanguage_4thedition$ code cppenv
Installing VS Code Server for Linux x64 (e170252f762678dec6ca2cc69aba1570769a5d39)
Downloading: 100%
Unpacking: 100%
Unpacked 1548 files and folders to /home/yy/.vscode-server/bin/e170252f762678dec6ca2cc69aba1570769a5d39.
Looking for compatibility check script at /home/yy/.vscode-server/bin/e170252f762678dec6ca2cc69aba1570769a5d39/bin/helpers/check-requirements.sh
Running compatibility check script
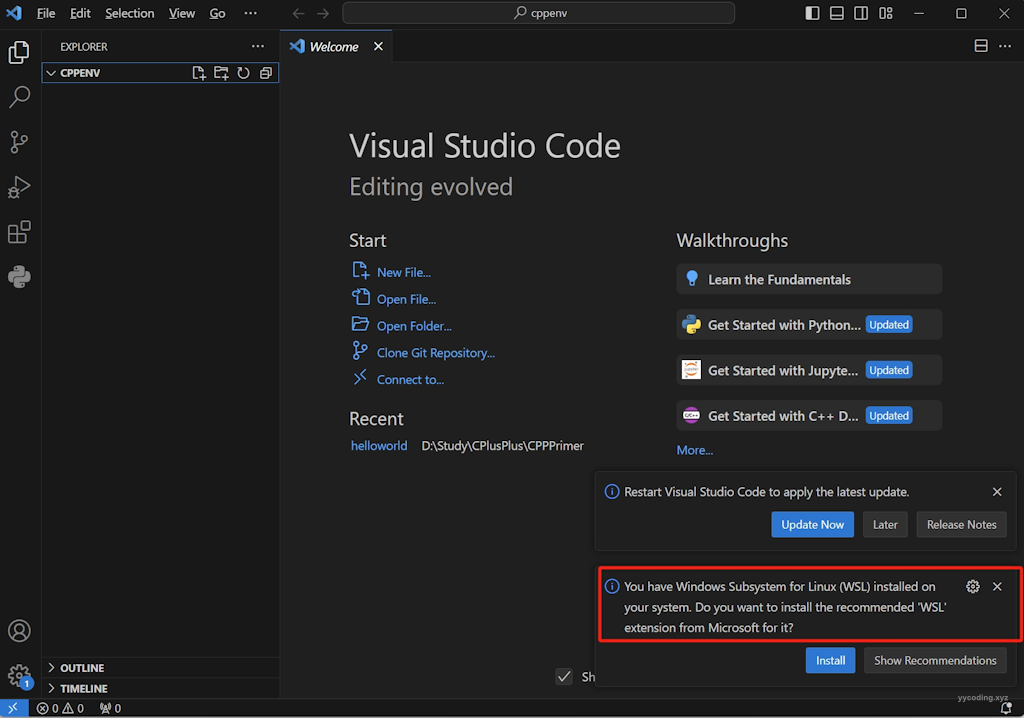
Compatibility check successful (0)首次打开时,会启动Windows 11本机安装的VS Code来远程连接到Ubuntu上。会有以下提醒。
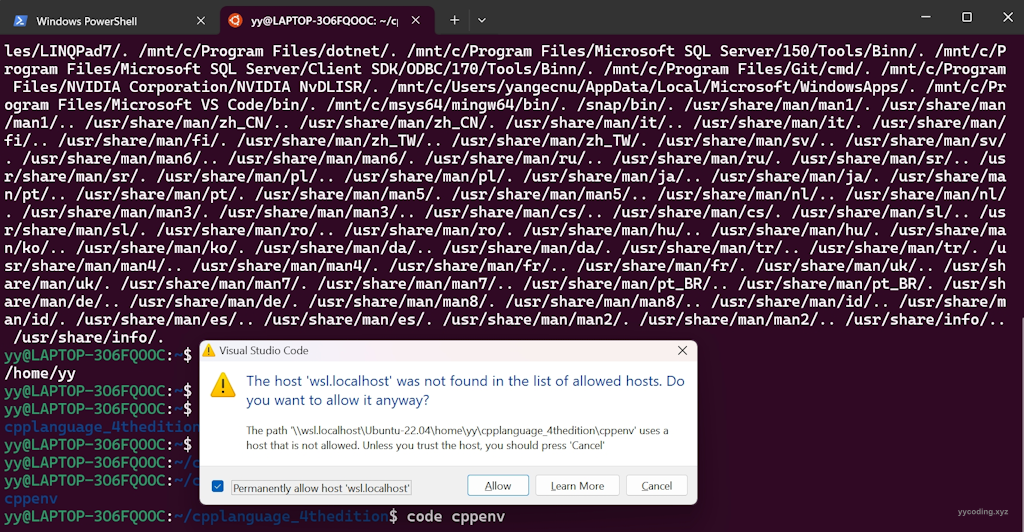

全部点击确定。
然后Visual Studio Code打开后,会提示是否需要安装一个Visual Studio Code WSL的插件,这里点击确定即可。
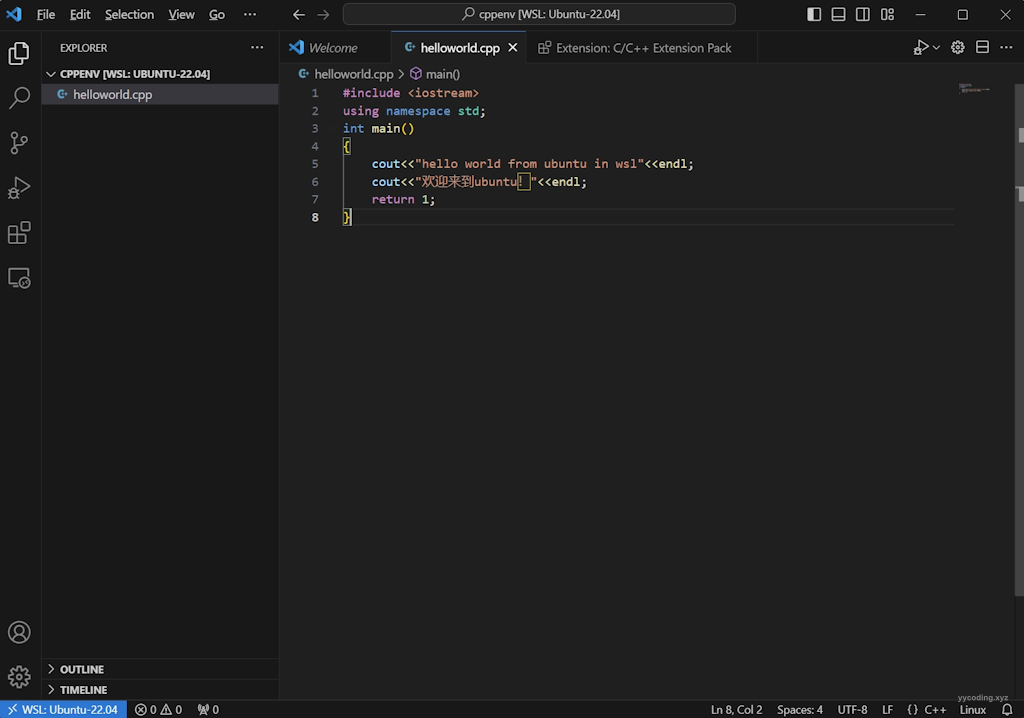
然后新建一个名为helloworld.cpp的C++文件,这时VS Code会提示你是否安装一个“C/C++ Extension Pack”插件,点击安装。
C++代码写好了之后,点击右上角里面的“Run C++ file"。
这时,我们选择第二项,使用g++来编译,使用gcc编译C++文件会报错,需要更多的参数配置。
这时,在下面的终端中可以看到编译和运行的结果。

当然,还可以直接在命令行里运行:
./helloworld也能看到输出结果。这里可以看到,是完美支持中文的,因为他默认就是使用UTF-8编码,如果在Windows上使用VS Code来编译C++,输出到终端里面中文很大概率是乱码。
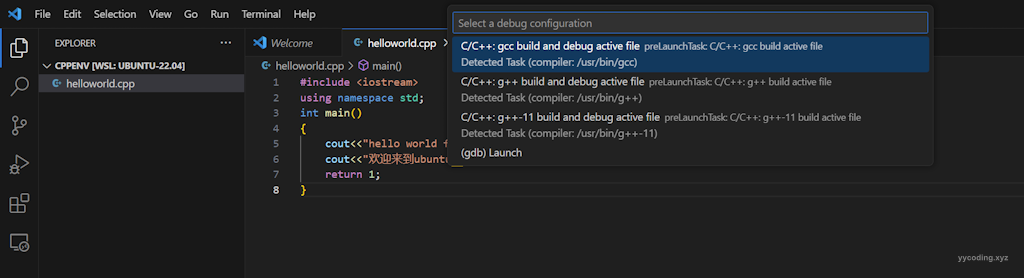
还可以设置断点,进行调试。
再次点击右上角的三角按钮,这次选择”debug c++ file"。在弹出的选择项目中,选择g++ gdb进行调试,也可以点击齿轮设置默认的调试器。

可以看到断点被命中。
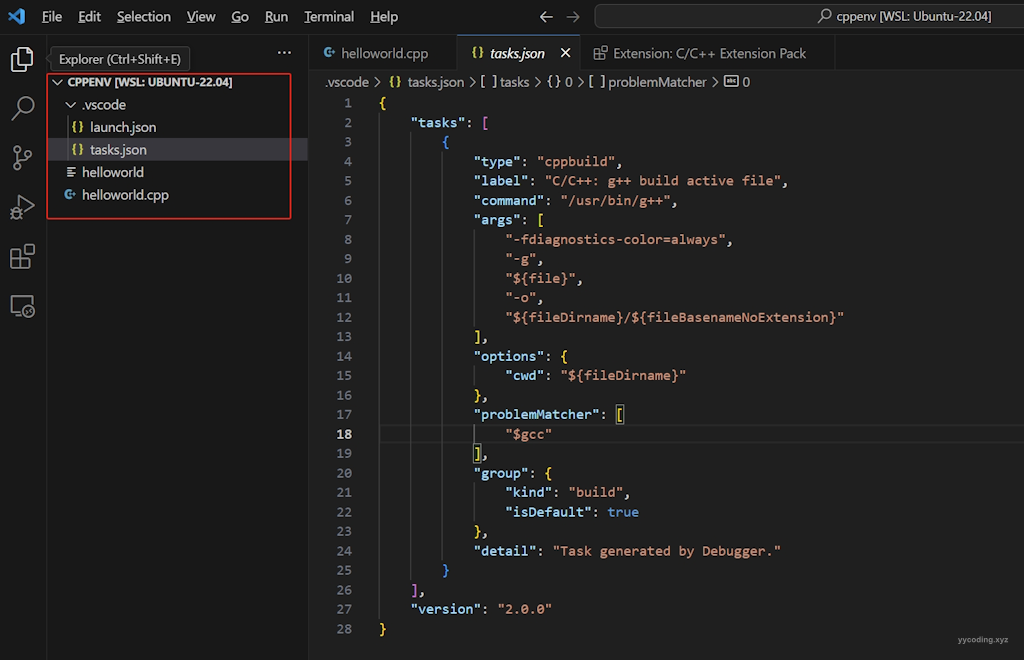
在目录文件下,有个.vscode的文件夹,这个文件夹里面就是对C++编译器和调试器的配置。这个可以在其它的项目中通用。
后面,假如我要做第一章第一节的练习,只需要将cppenv这个文件夹拷贝一份,改名为chapter1_1_basic,然后再用vscode打开这个目录即可,这些配置就不需要再次配置了。
yy@LAPTOP-3O6FQOOC:~/cpplanguage_4thedition$ cp -r cppenv chapter1_1_basic
yy@LAPTOP-3O6FQOOC:~/cpplanguage_4thedition$ ls
chapter1_1_basic  cppenv
Ubuntu下面的这些文件,在Windows资源管理器中可以直接查看。如下,可以看到在yy目录下新建的目录。

上面介绍的是使用gcc,当然也可以使用clang来编译,方法是首先安装clang:
sudo apt-get install clang
sudo apt-get install -y libc++-dev libc++abi-dev
然后在VSCode的C++项目中:
- 按 Ctrl+Shift+P 打开命令面板。
- 输入 tasks 并选择 "Tasks: Configure Tasks"。
- 在里面选择“C/C++: clang++ build active file”
最后task.json如下:
{
    "tasks": [
        {
            "type": "cppbuild",
            "label": "C/C++: g++ build active file",
            "command": "/usr/bin/g++",
            "args": [
                "-fdiagnostics-color=always",
                "-g",
                "${file}",
                "-o",
                "${fileDirname}/${fileBasenameNoExtension}"
            ],
            "options": {
                "cwd": "${fileDirname}"
            },
            "problemMatcher": [
                "$gcc"
            ],
            "group": "build",
            "detail": "Task generated by Debugger."
        },
        {
            "type": "cppbuild",
            "label": "C/C++: clang++ build active file",
            "command": "/usr/bin/clang++",
            "args": [
                "-fcolor-diagnostics",
                "-fansi-escape-codes",
                "-g",
                "${file}",
                "-o",
                "${fileDirname}/${fileBasenameNoExtension}"
            ],
            "options": {
                "cwd": "${fileDirname}"
            },
            "problemMatcher": [
                "$gcc"
            ],
            "group": "build",
            "detail": "compiler: /usr/bin/clang++"
        }
    ],
    "version": "2.0.0"
}
在编译的时候,选择Terminal->RunTask在列表中选择上述的“C/C++: clang++ build active file”即可。
参考:
- https://learn.microsoft.com/en-us/windows/wsl/install
- https://learn.microsoft.com/en-us/windows/wsl/install-manual
- https://code.visualstudio.com/docs/cpp/config-wsl
- https://code.visualstudio.com/docs/cpp/config-mingw
- https://code.visualstudio.com/docs/remote/wsl
- https://learn.microsoft.com/en-gb/archive/blogs/wsl/windows-subsystem-for-linux-overview
- https://zhuanlan.zhihu.com/p/652537694